
LEGO PlayStation 72306 Review: A Console Full of Memories
Some sets bring back a place. This one brought back a whole weekend: Crash Bandicoot on the screen, the original PlayStation on the floor, and me refusing to turn it off because I didn’t have a memory card yet.
LEGO PlayStation 72306 gets that familiar shape right, but the build gave me more to enjoy than a gray console on a shelf. There are two little games tucked inside, printed details where I most wanted them, and a power indicator that made me stop and test it. There are also plenty of stickers, a few demanding connections and buttons that needed some patience on my copy.
I built all 14 bags on October 9, 2026. Here’s how it went.
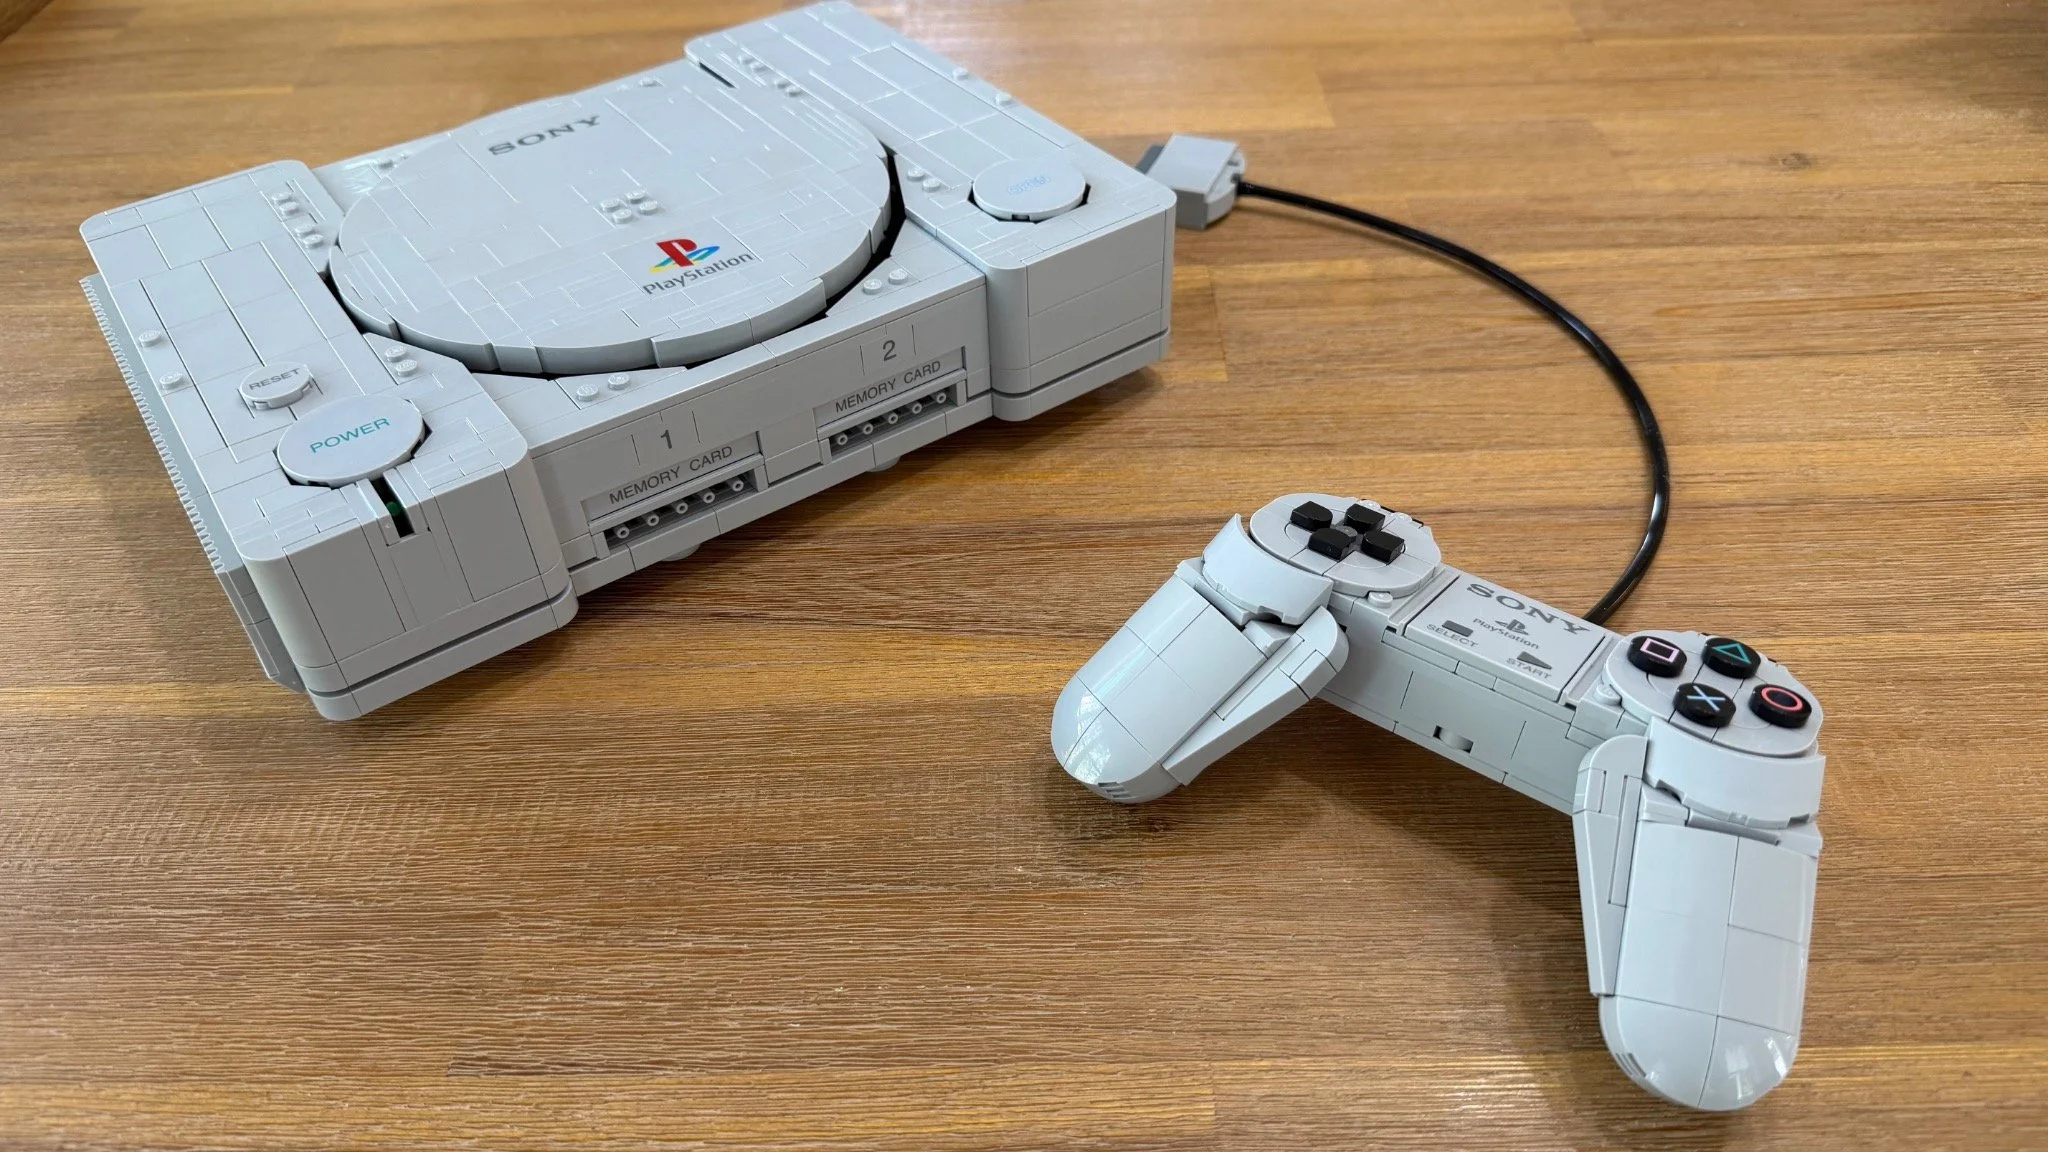
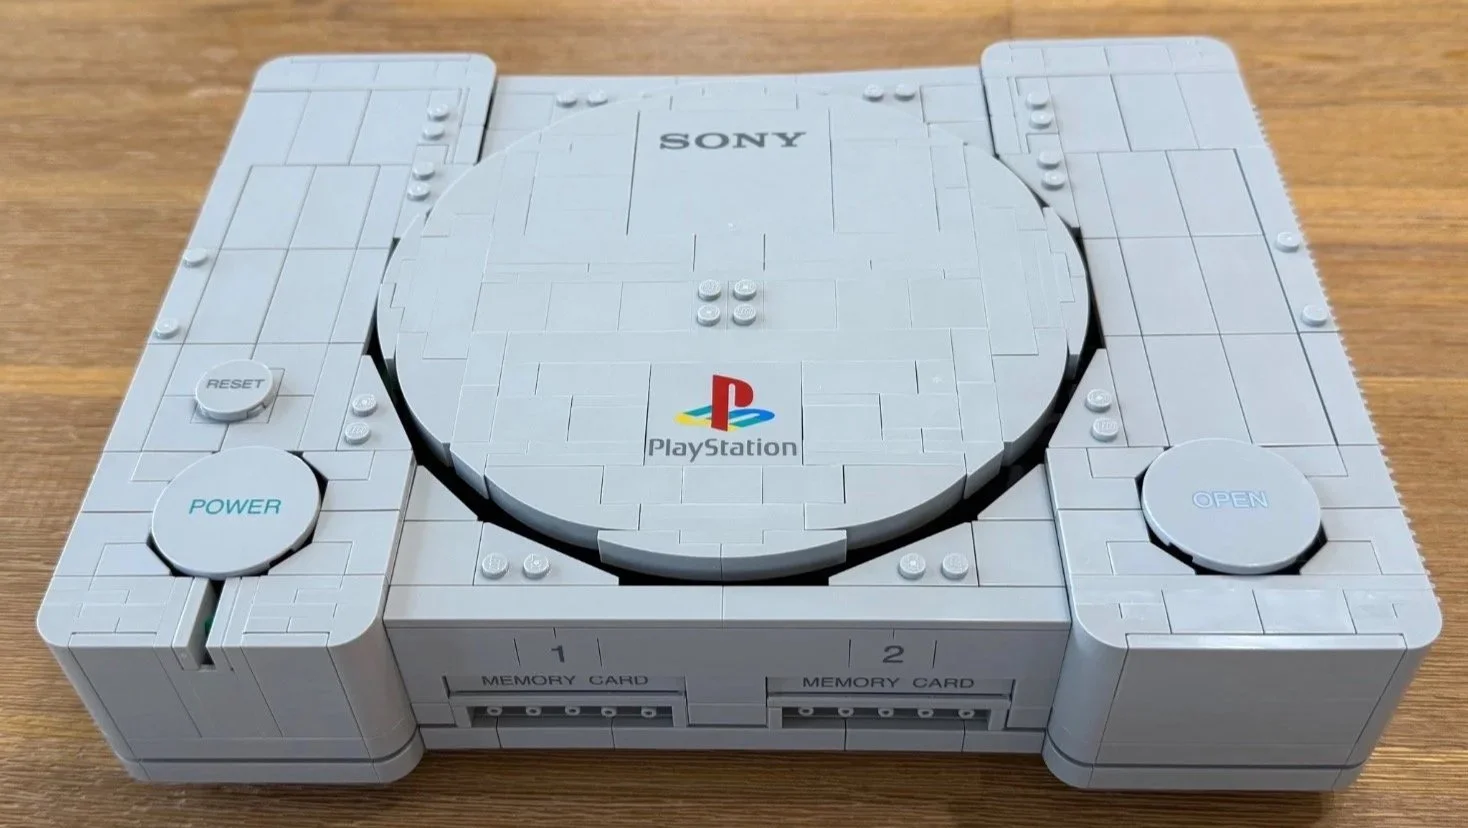
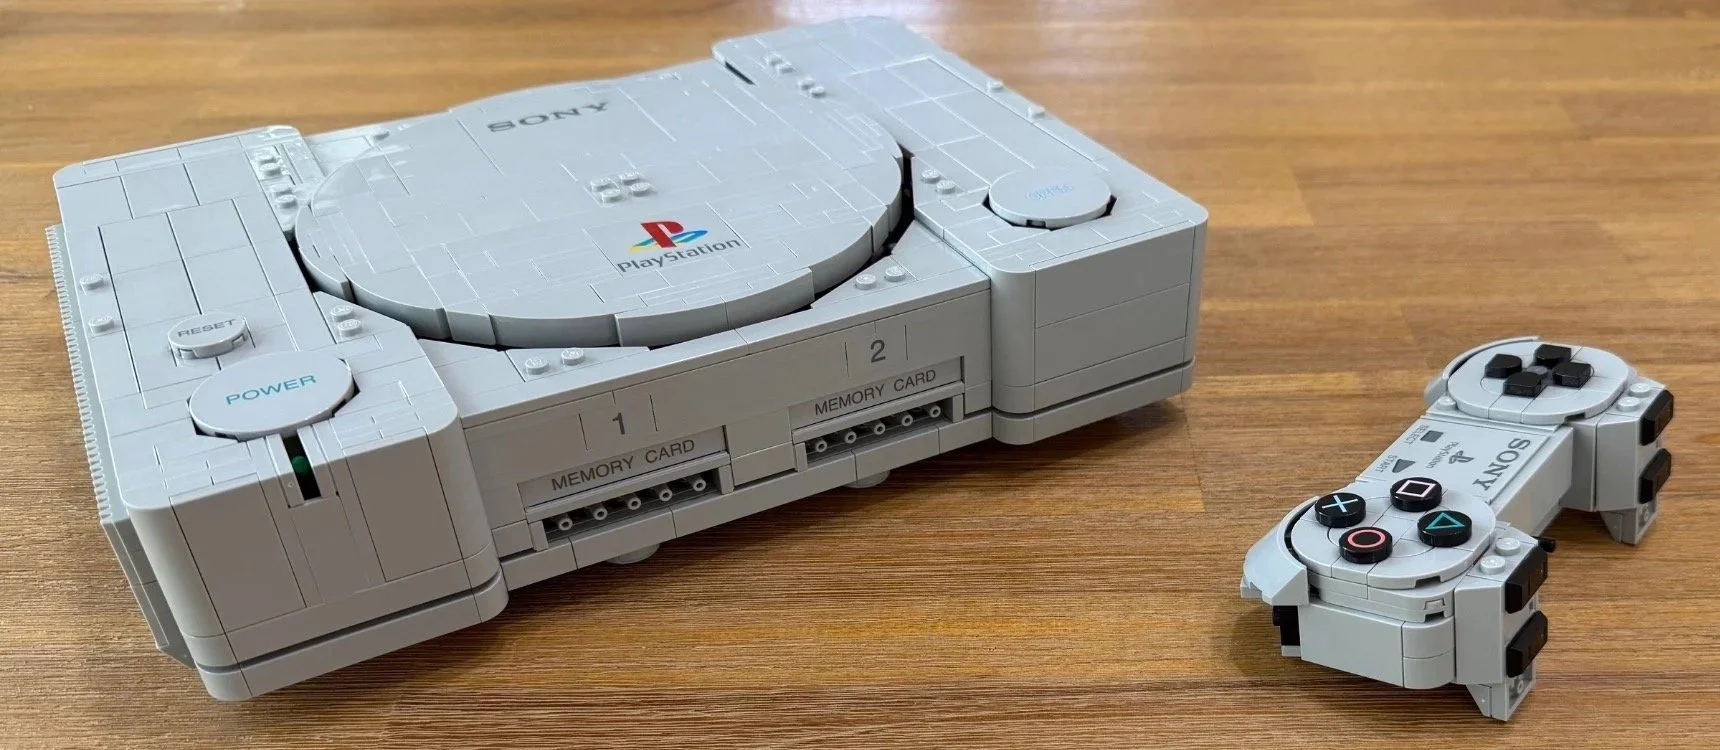
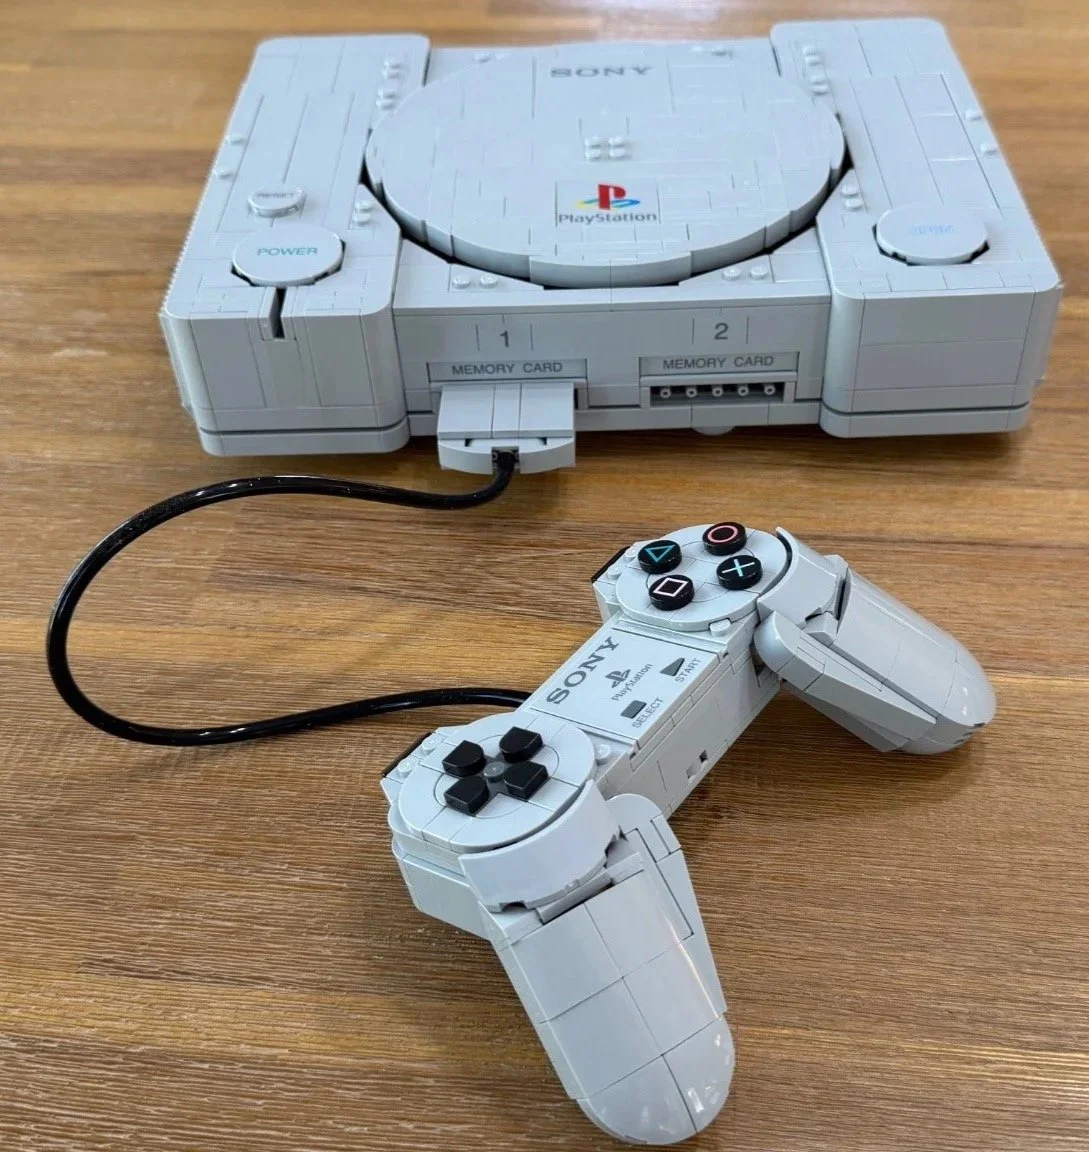
The finished console and controller brought back a lot of PlayStation memories.
At a Glance
Set: LEGO PlayStation, 72306
Pieces: 1,911
Numbered bags: 14
LEGO age recommendation: 18+
Total logged bag time: 3 hours, 37 minutes, 54 seconds
Bag-average difficulty: 4.0/10
Bag-average repetition: 5.2/10
Bag-average dexterity: 5.1/10
My overall set rating: 9.6/10
Instruction complexity: 2/10
Stickers: 15 reported in my set notes; the bag-by-bag log has one missing entry, so that total is not fully reconciled.
Instructions: 854 steps recorded in LEGO Builder; the supplied booklet has 422 numbered main steps.
Build Time and Ratings
My bag timers include photos, notes and breaks during those sessions. Adding the 14 timers gives 3:37:54, but I excluded an approximately 15-minute repair in Bag 6. Including that detour would put the build at roughly 3 hours 53 minutes.
The three bag averages give every bag equal weight. They describe different demands: working out the assembly, repeating similar steps, and handling small or awkward connections. They are separate from my 9.6/10 overall set rating and 2/10 instruction complexity. Clear instructions can still lead you through a physically fiddly build.
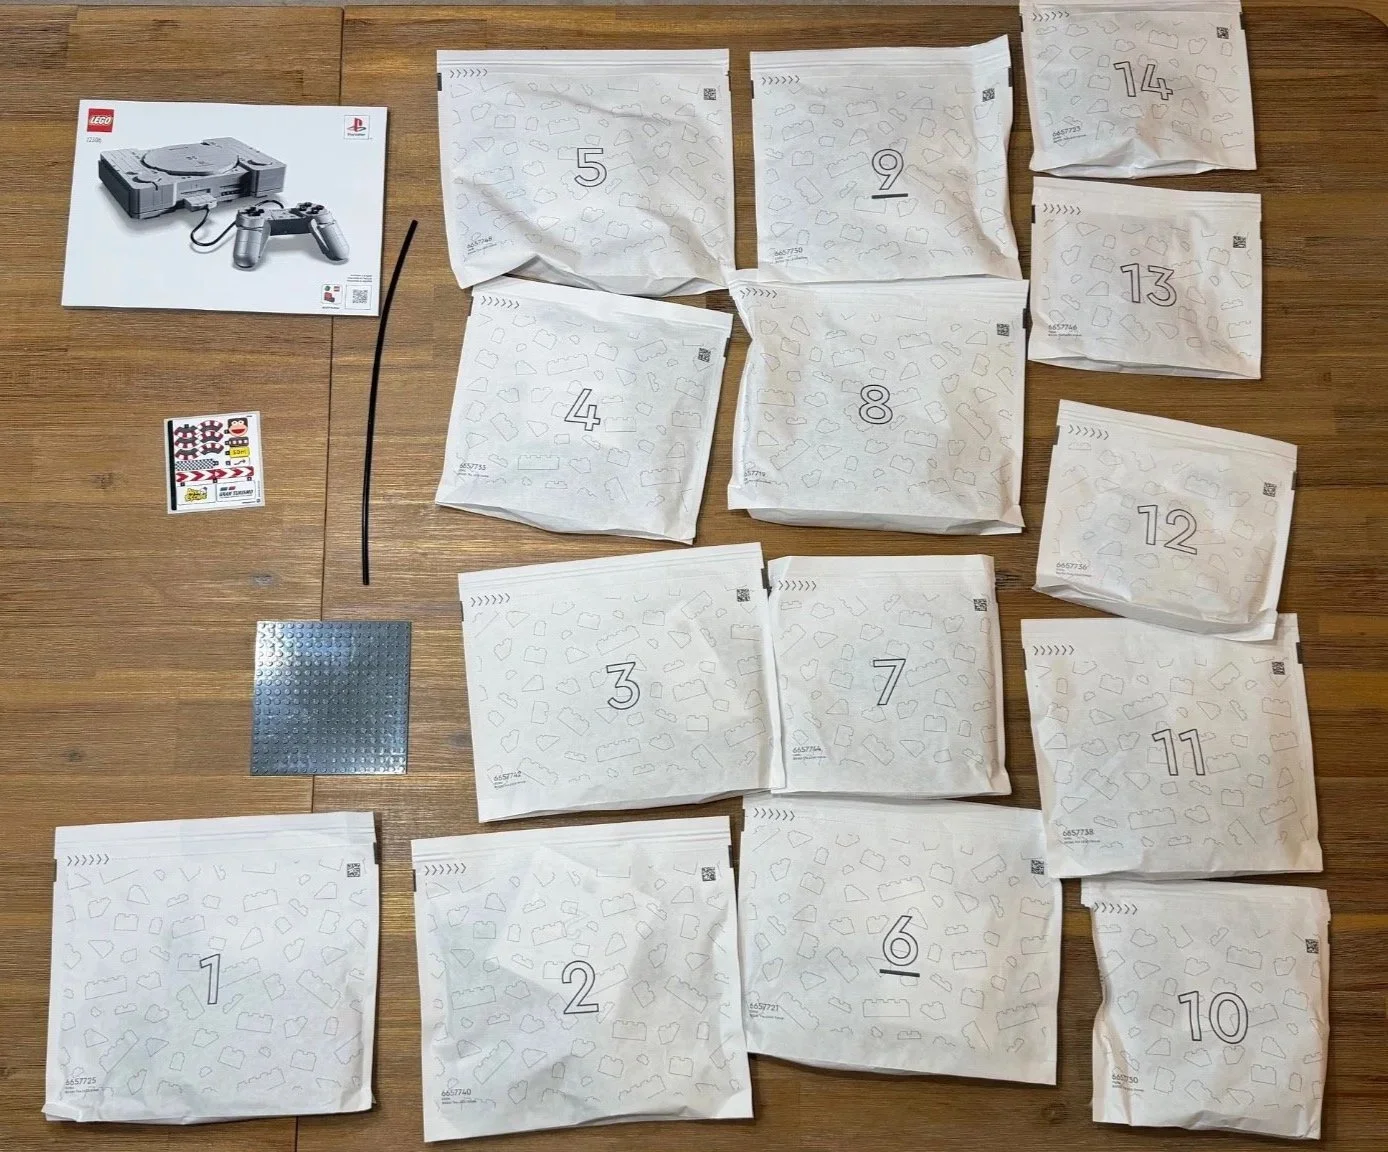
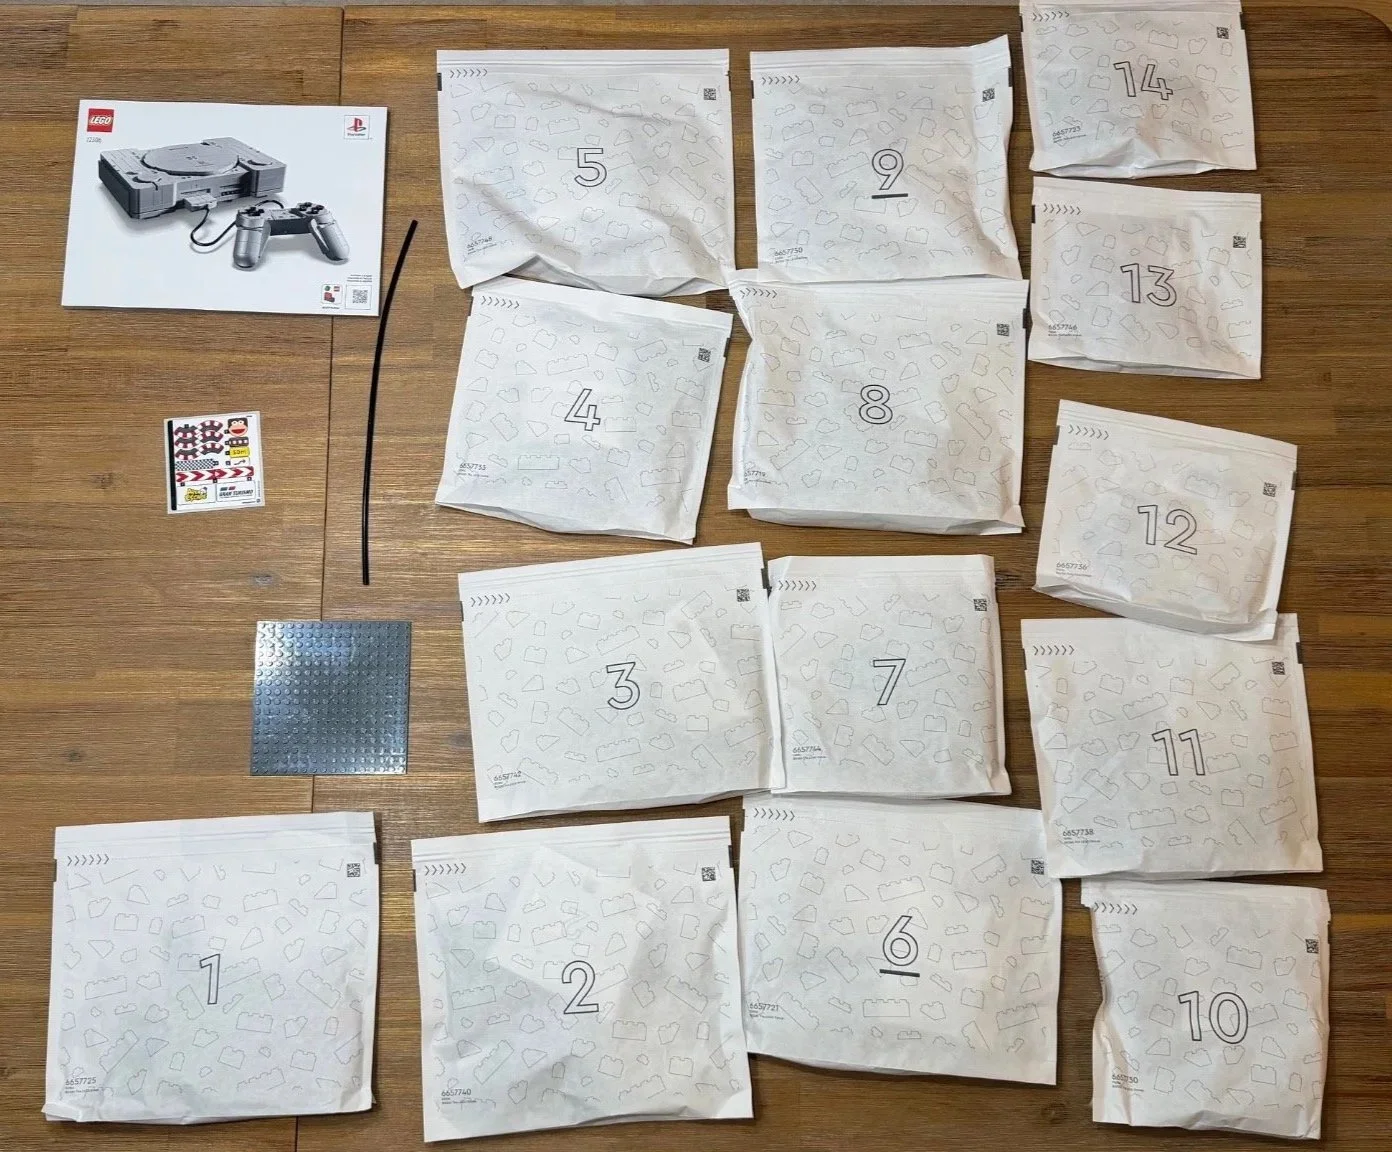
Fourteen bags, the instruction booklet and the pieces waiting to become a PlayStation.
The Build, Bag by Bag
Bag 1 — A hidden logo under the console
Time: 11:17 · Difficulty: 1.8/10 · Repetition: 5.2/10 · Dexterity: 1.5/10
The console starts on a large dark bluish gray 16 × 16 plate (6004927). There’s a steady run of dark bluish gray 1 × 4 tiles (4211053) and black 1 × 4 grooved bricks (265326), so this is a straightforward, somewhat repetitive foundation.
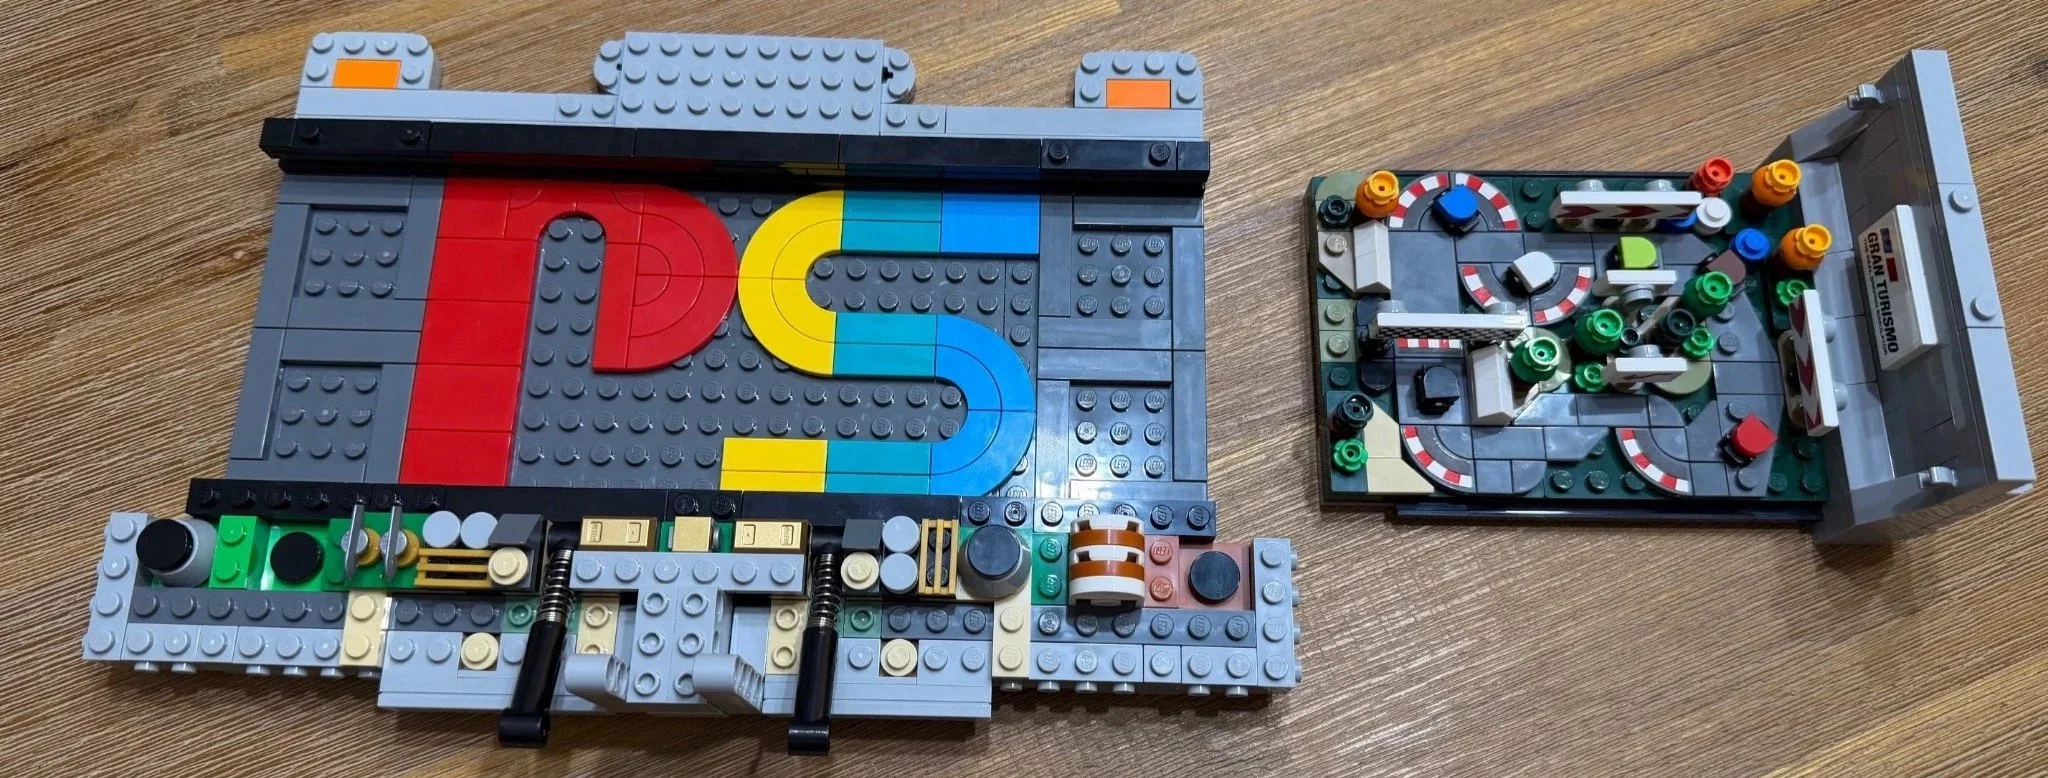
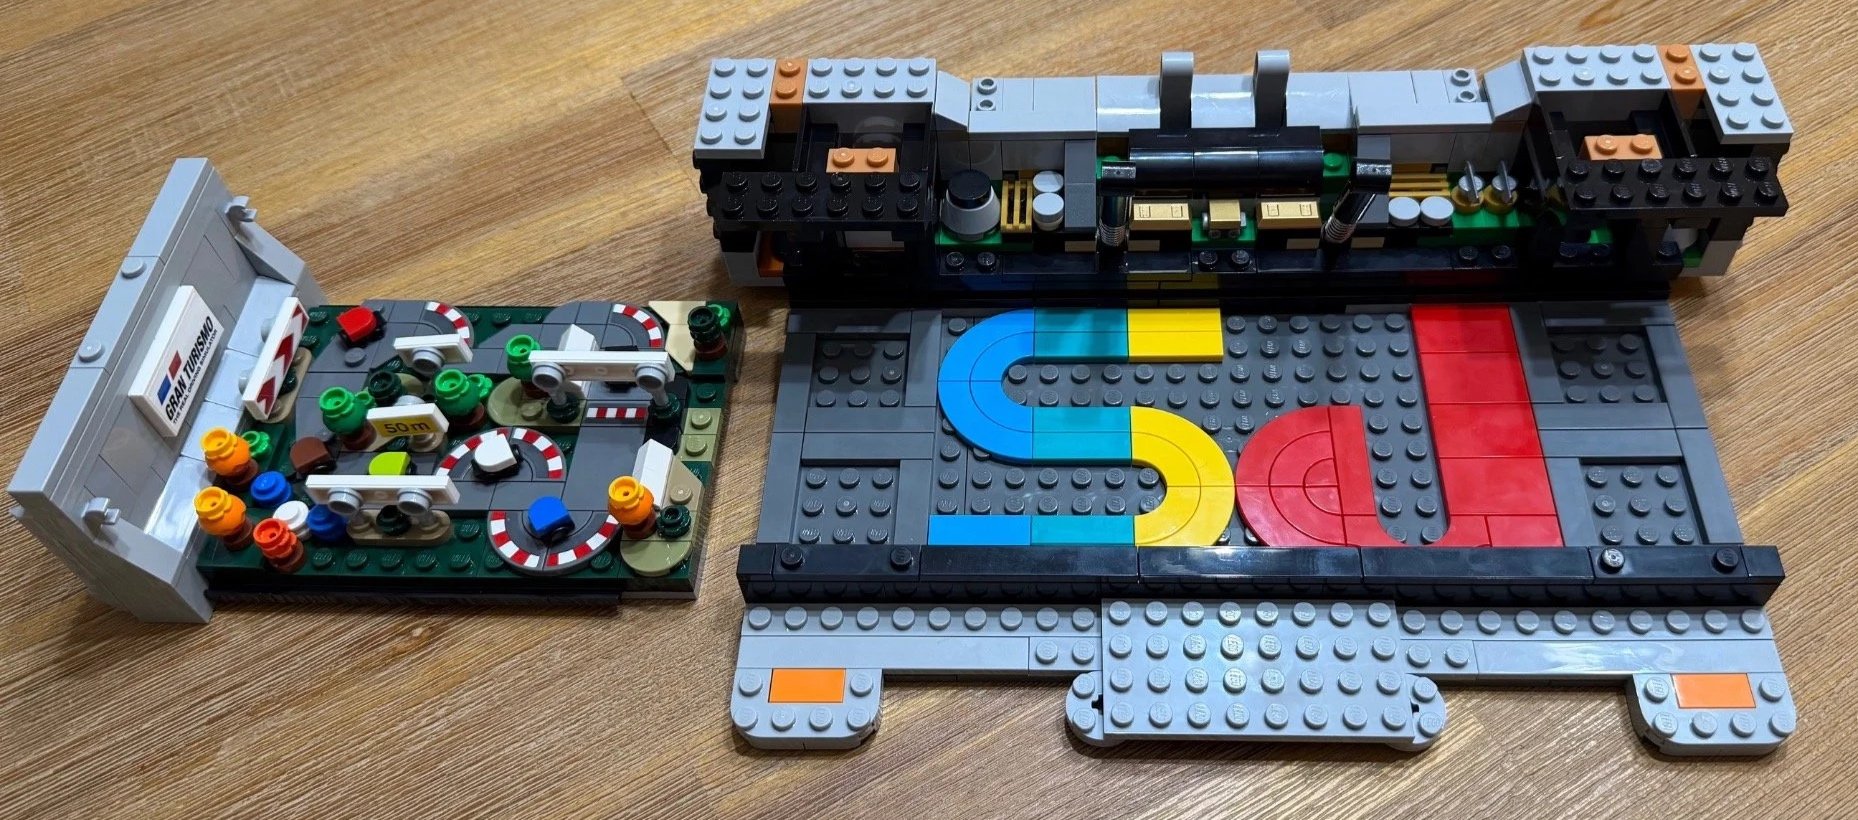
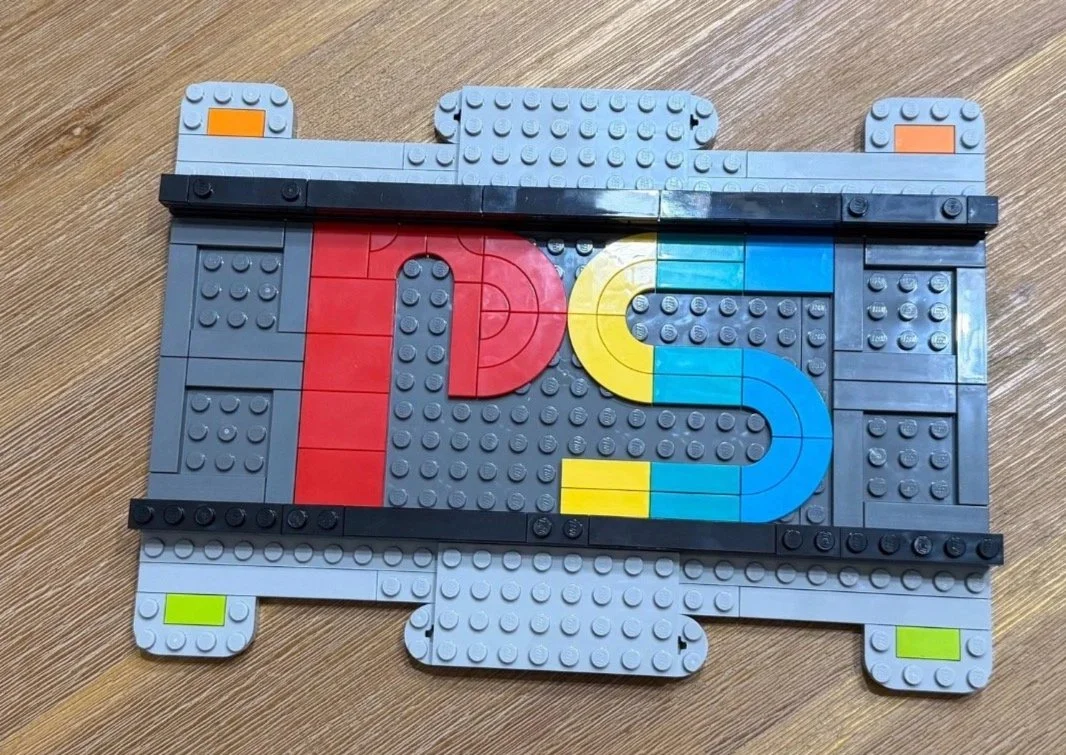
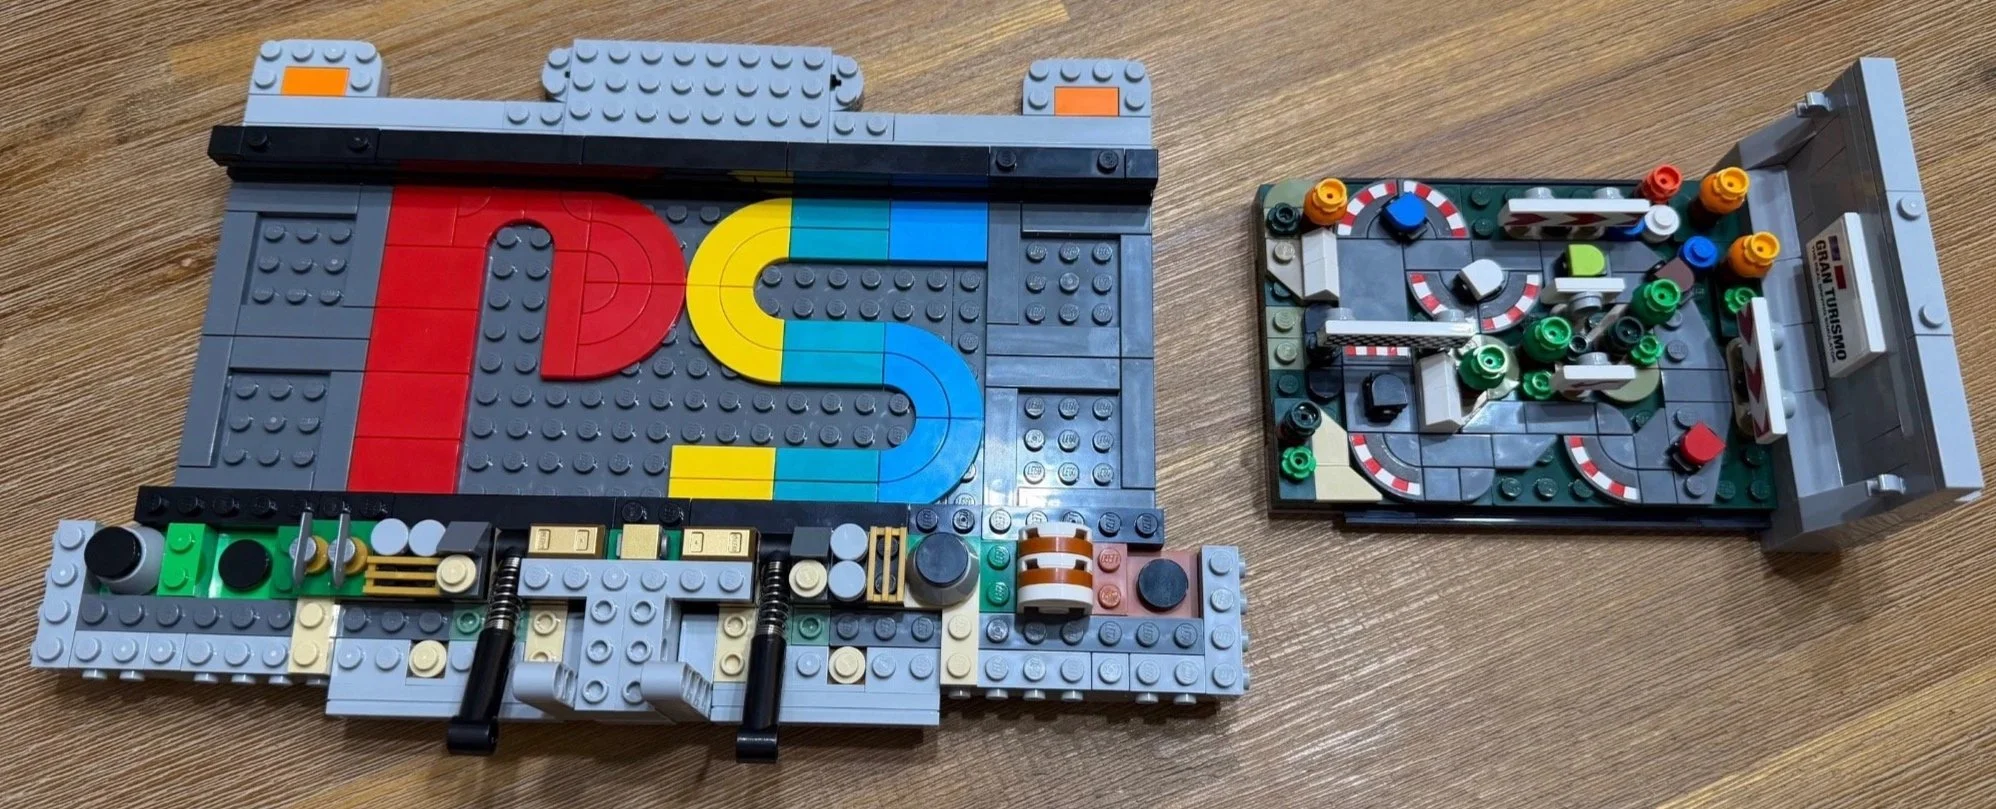
Then the multicolored PS logo appears in the base. It’s a lovely little reward before much of the console takes shape, and it put a smile on my face. I like a detail that gives you something to enjoy during the build, even when it will be tucked away later.
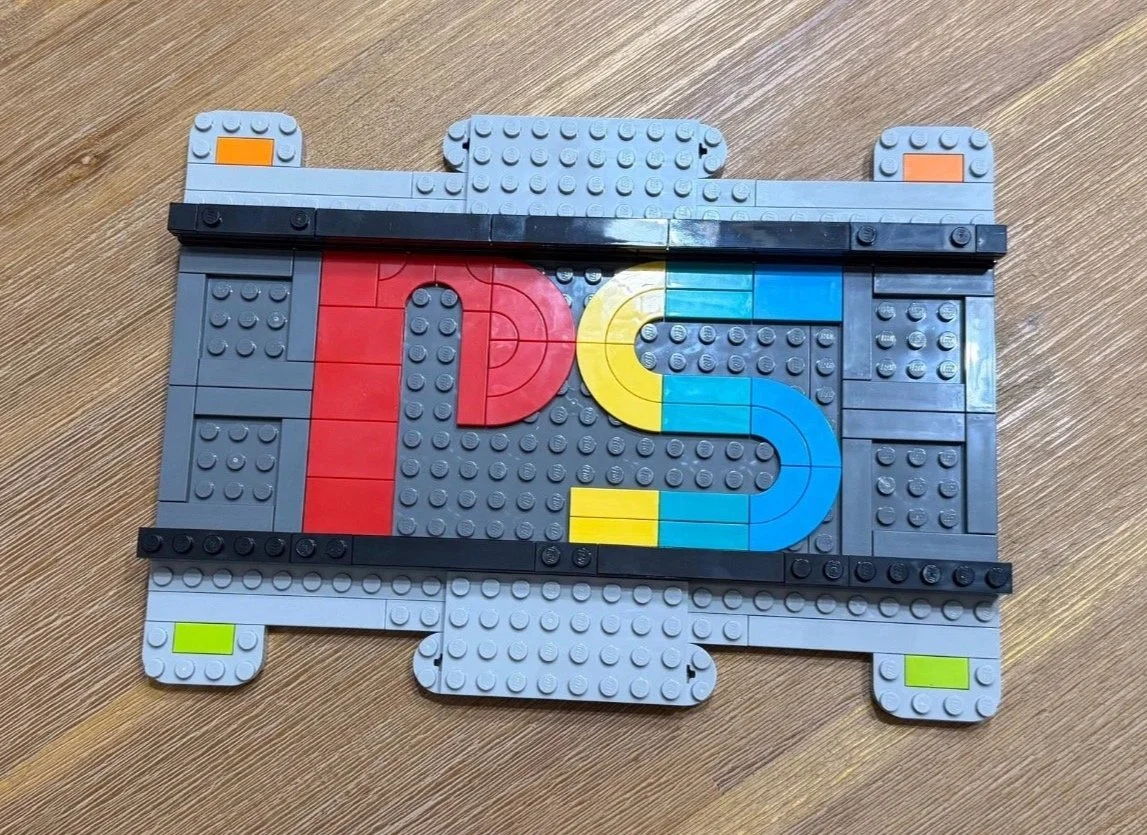
Bag 1 hides a little PlayStation nostalgia in the base.
Bag 2 — Gran Turismo, one tiny detail at a time
Time: 28:40 · Difficulty: 6.5/10 · Repetition: 5.0/10 · Dexterity: 8.7/10
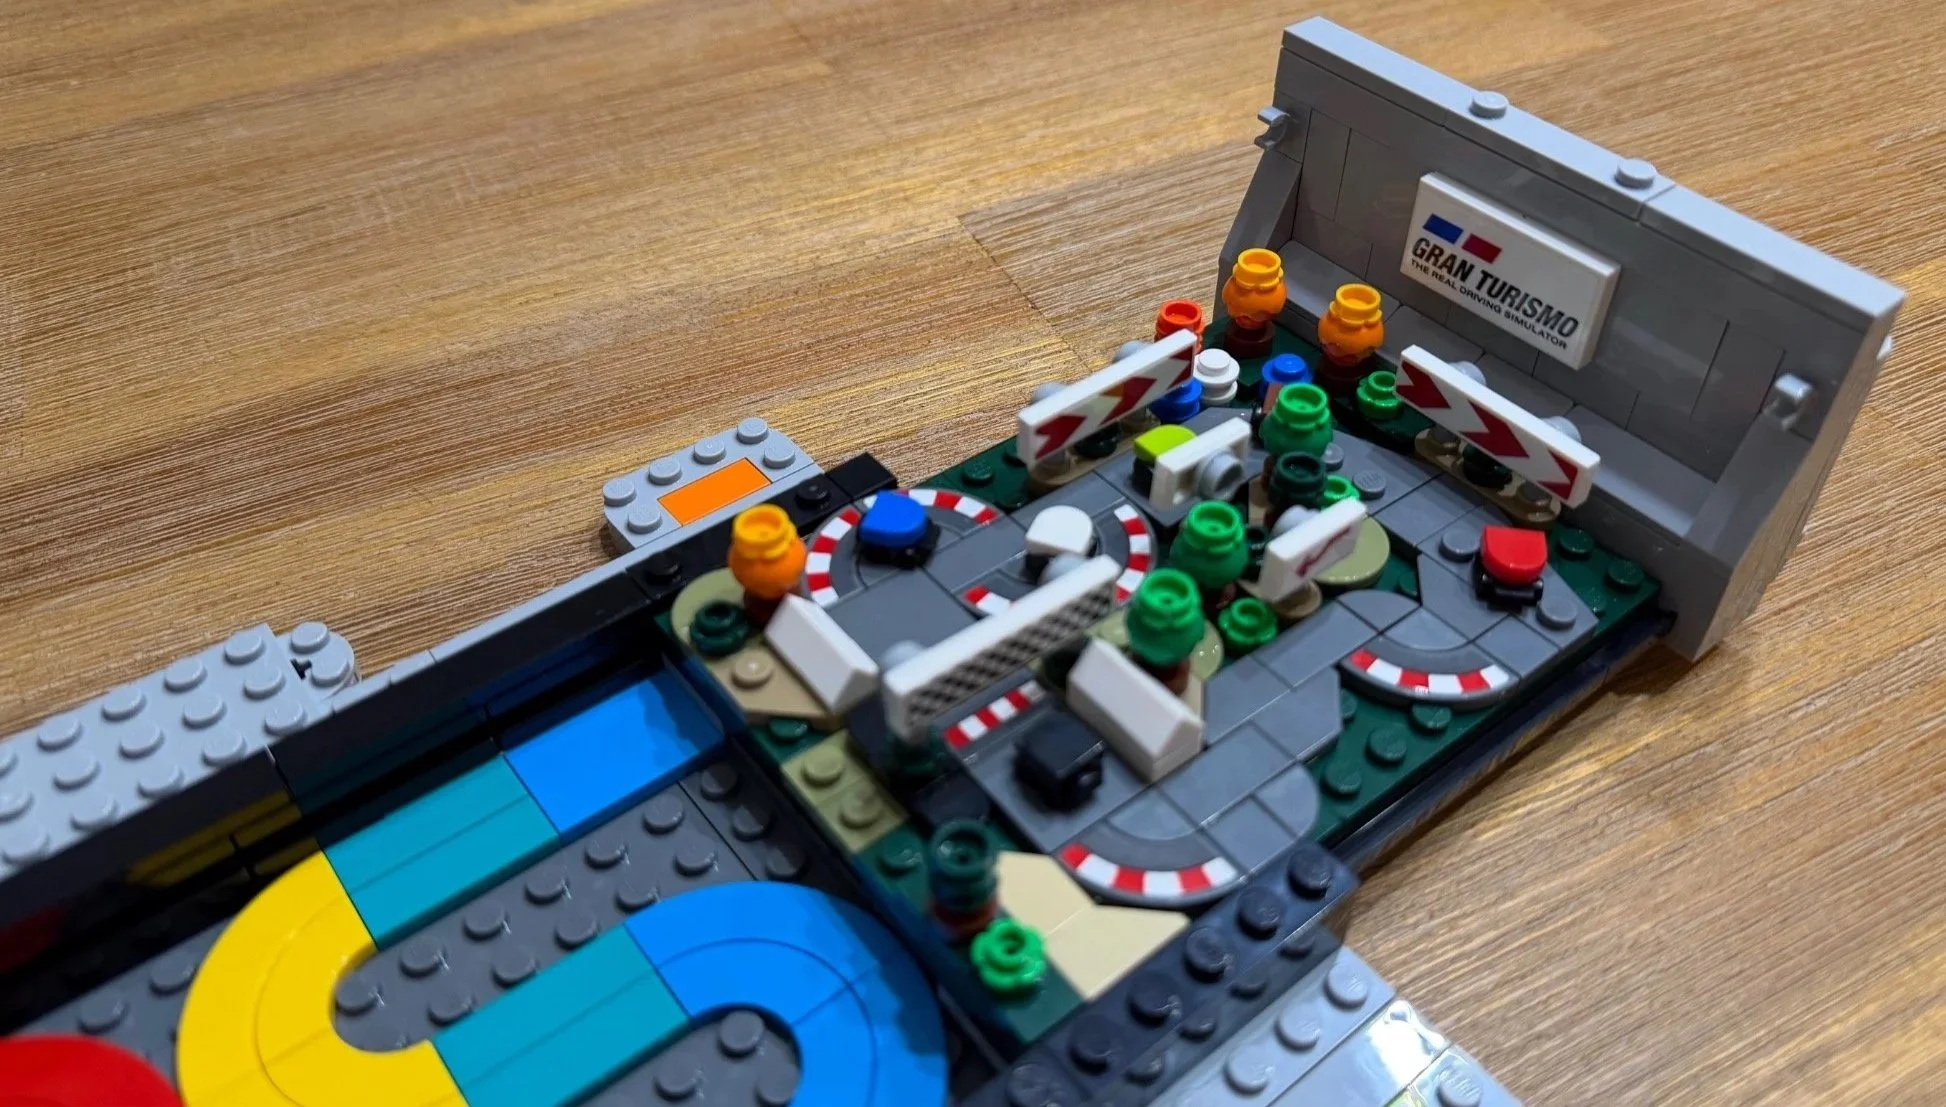
This was my favorite bag. You step away from the console to build a Gran Turismo racing scene, with tiny cars, track details, barriers and a checkered racing backdrop. It feels like getting a small set inside the larger one.
It also asks a lot of your fingers. Small parts and cramped placements slow things down, and I applied 13 stickers here. That was my least enjoyable part of the whole build, even though I loved the result. A brick separator helped me position the stickers without getting my fingers in the way.
At nearly half an hour, this was my longest timed bag. It’s a fun introduction to micro building, provided you’re ready to take your time with it.
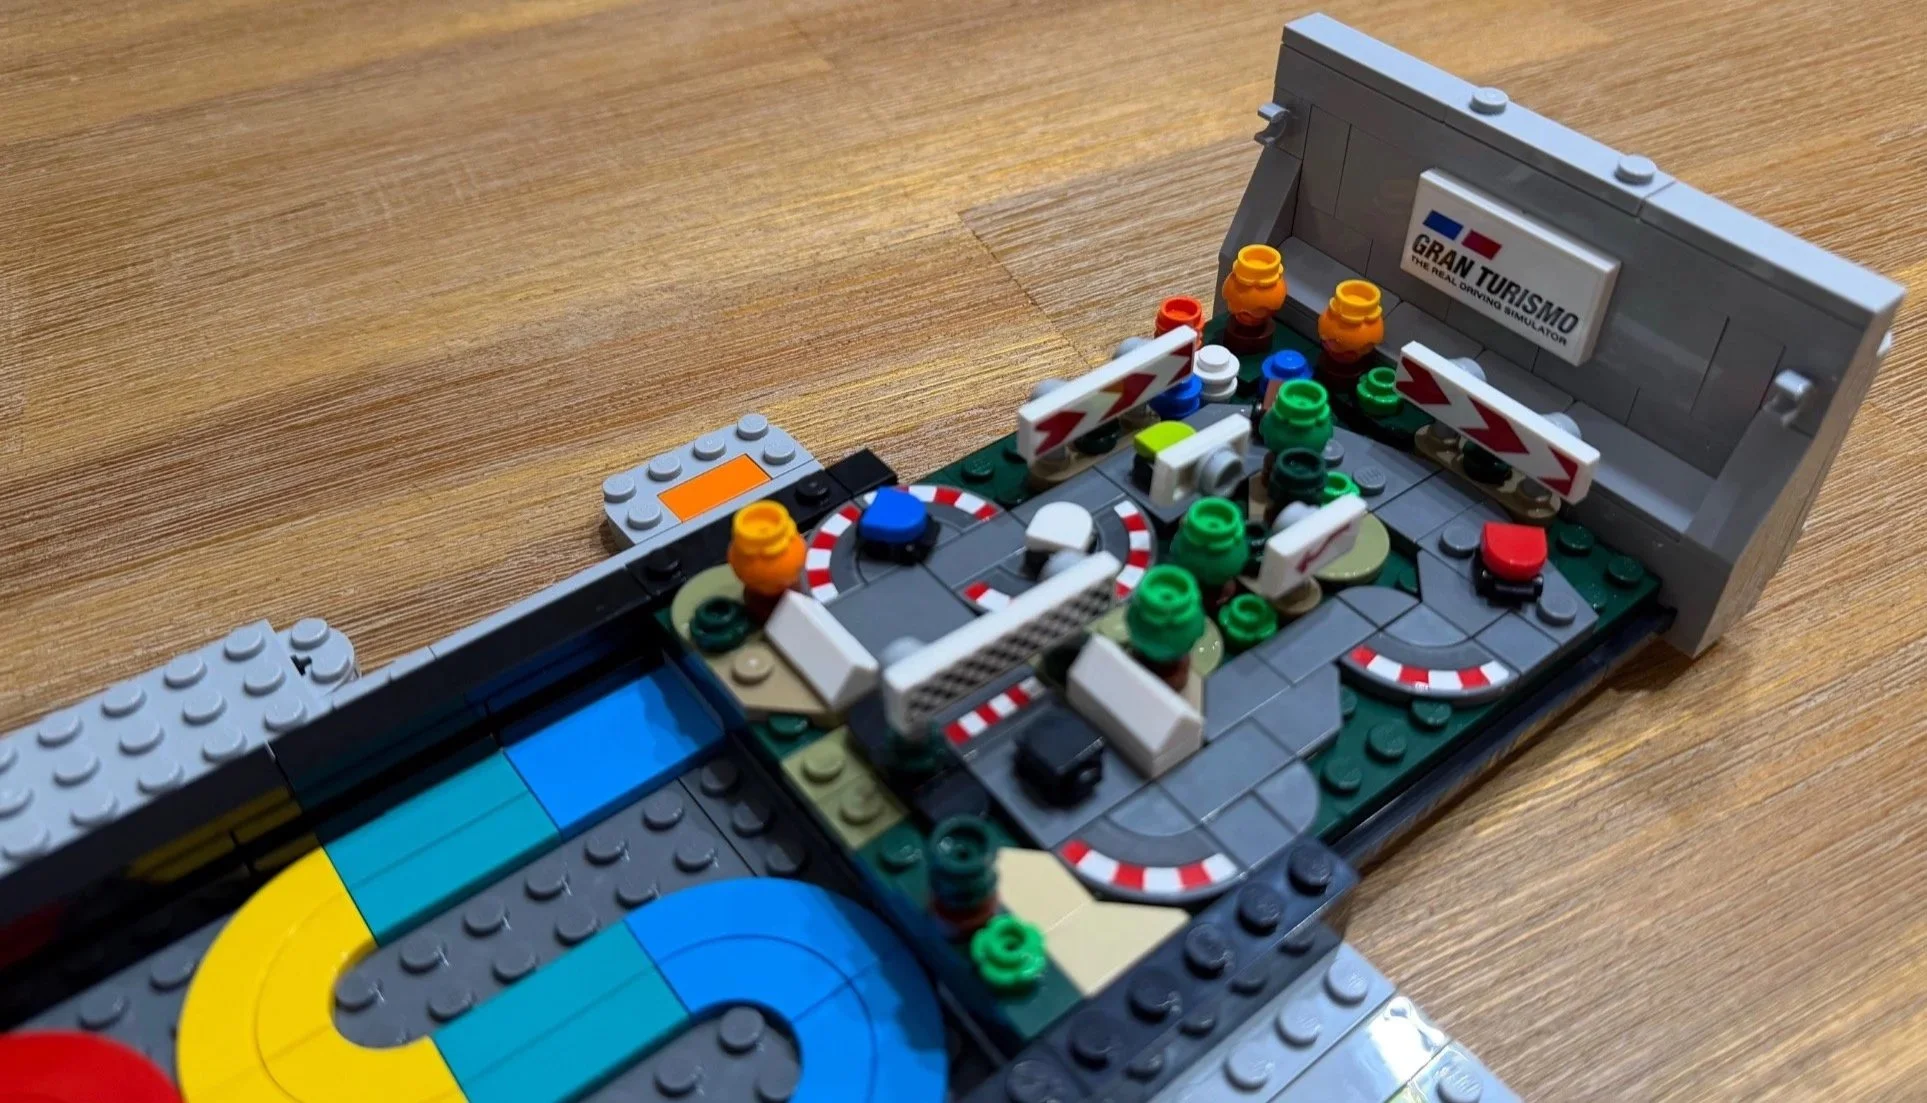
My favorite bag: a tiny Gran Turismo build with plenty of fiddly details.
Bag 3 — Electronics and the first part of the lid mechanism
Time: 12:55 · Difficulty: 3.8/10 · Repetition: 3.5/10 · Dexterity: 4.9/10
Back inside the console, small pieces suggest circuit-board components around the base. I enjoyed the change from a miniature race scene to something that feels like assembling the inside of a game system.
The Technic structure introduced here is part of the disc-lid mechanism developed later in the build. At this point you’re making its foundation, rather than a finished opening action. Check the direction of the axle and surrounding brackets as you go; these early connections need to line up with the later mechanism.
The console’s internal details and the first part of the lid mechanism take shape.
Bag 4 — The console starts growing upward
Time: 17:19 · Difficulty: 4.4/10 · Repetition: 4.6/10 · Dexterity: 5.1/10
This bag mixes little internal details with larger pieces of the rear shell. That change of scale kept it enjoyable: a few careful small-piece placements, then something more substantial to attach.
The back wall starts gaining height, and the electronics details begin to feel housed inside a console rather than spread across a base. Bags 3 and 4 were a satisfying stretch of the build for me. My Bag 4 sticker entry is blank, so I’m leaving it unrecorded rather than assuming zero.
Small internal details give way to larger sections of the rear shell.
Bag 5 — Controller ports and printed memory-card labels
Time: 17:45 · Difficulty: 4.0/10 · Repetition: 6.6/10 · Dexterity: 4.6/10
The focus moves to the front. Similar controller-port assemblies introduce some repetition, but attaching them gives the console one of its most recognizable features.
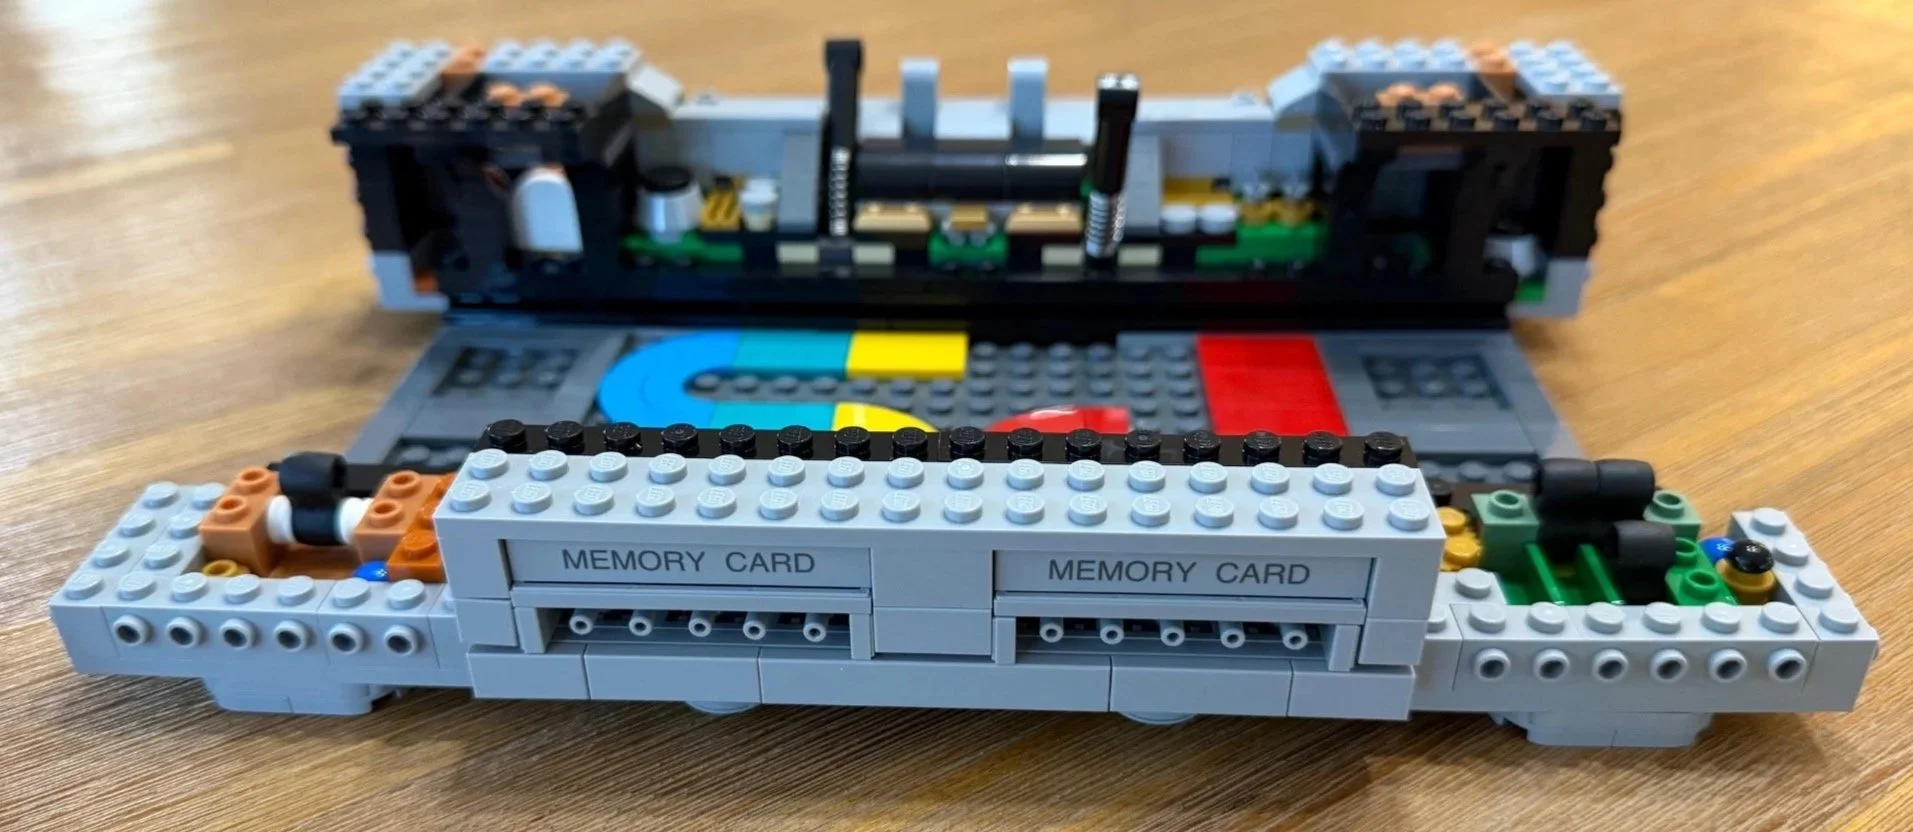
The memory-card port surrounds follow toward the end of the bag. Their labels are printed, which I was very happy to see. These details sit right on the front of the finished display; having crisp printed pieces here matters much more to me than another internal decoration.
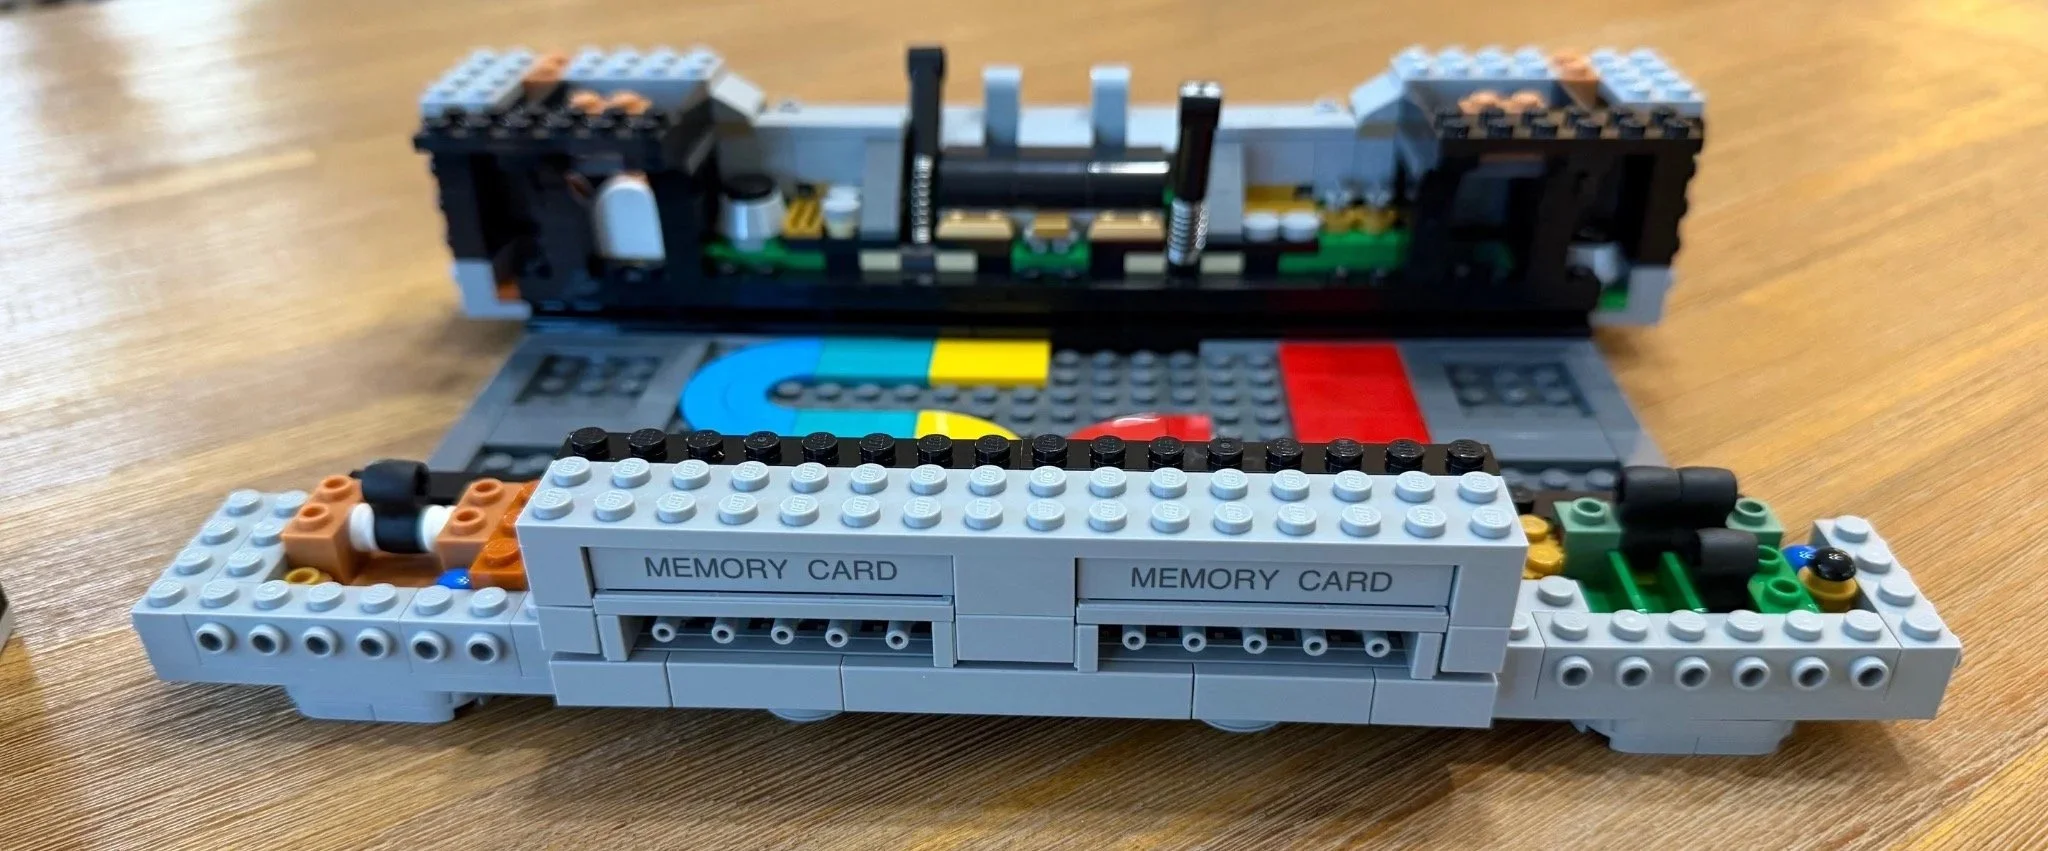
Printed memory-card labels are a welcome detail on the front of the console.
Bag 6 — Two button mechanisms, and my orientation detour
Time: 18:11 · Difficulty: 5.5/10 · Repetition: 4.4/10 · Dexterity: 6.3/10
The Power and Open buttons get different internal assemblies. The Power mechanism works around a translucent green rod and a moving assembly above it; the Open mechanism takes a different route toward releasing the lid. Building two different functions kept this bag interesting.
This is also where I discovered I had mixed up the front and back orientation of earlier pieces. Fixing it took approximately 15 minutes, which I excluded from the 18:11 recorded above. Before moving on, compare the front controller-port side and rear wall against the instruction view. It’s an easy check that would have saved me the detour.
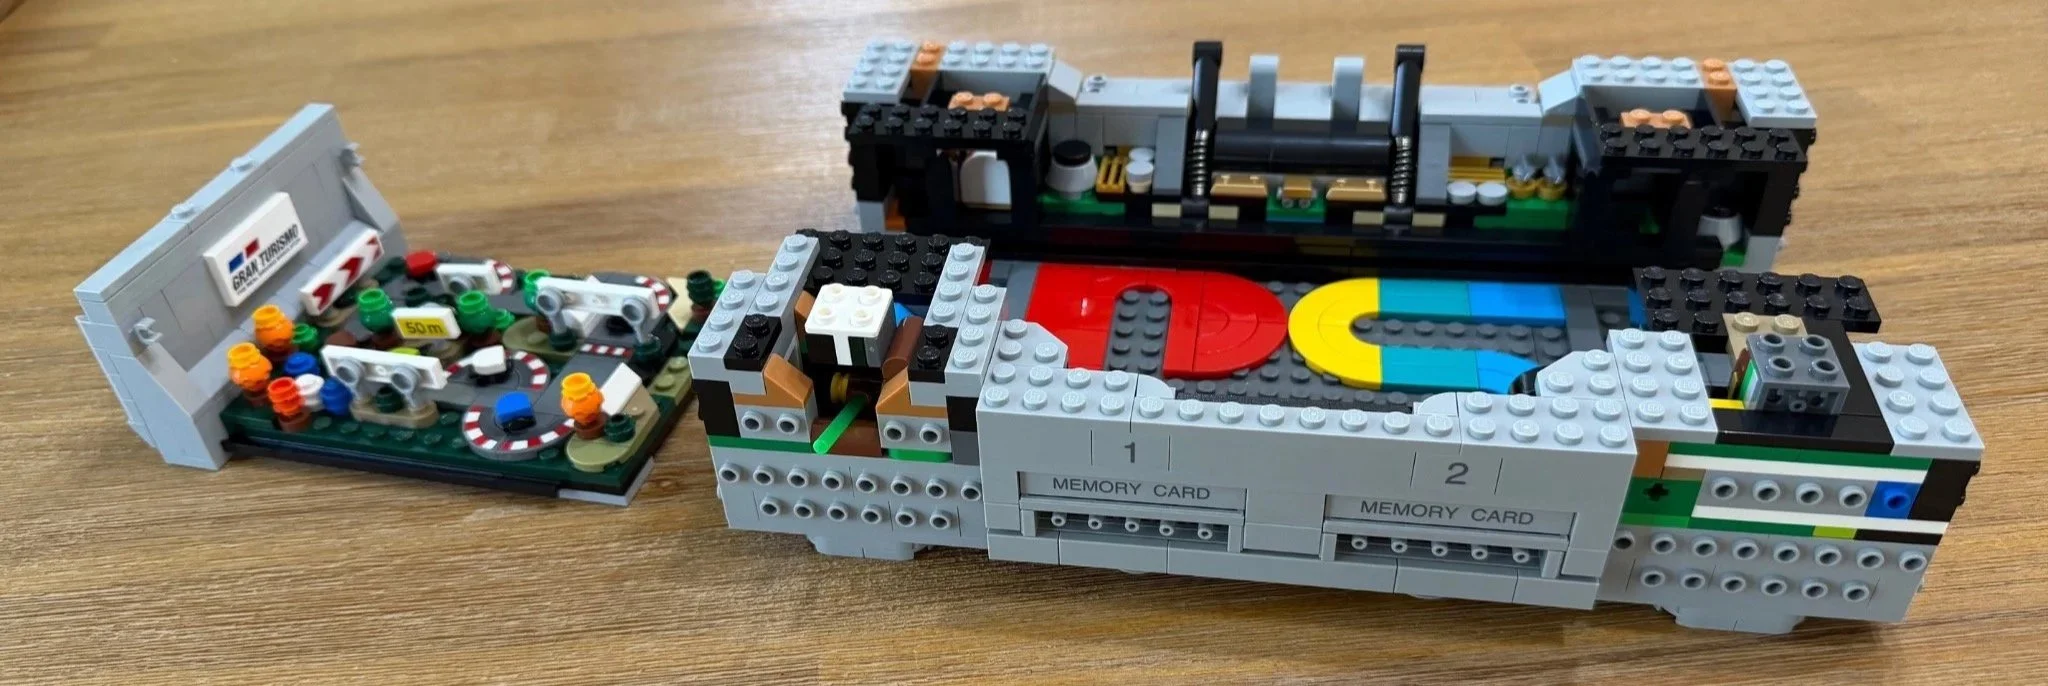
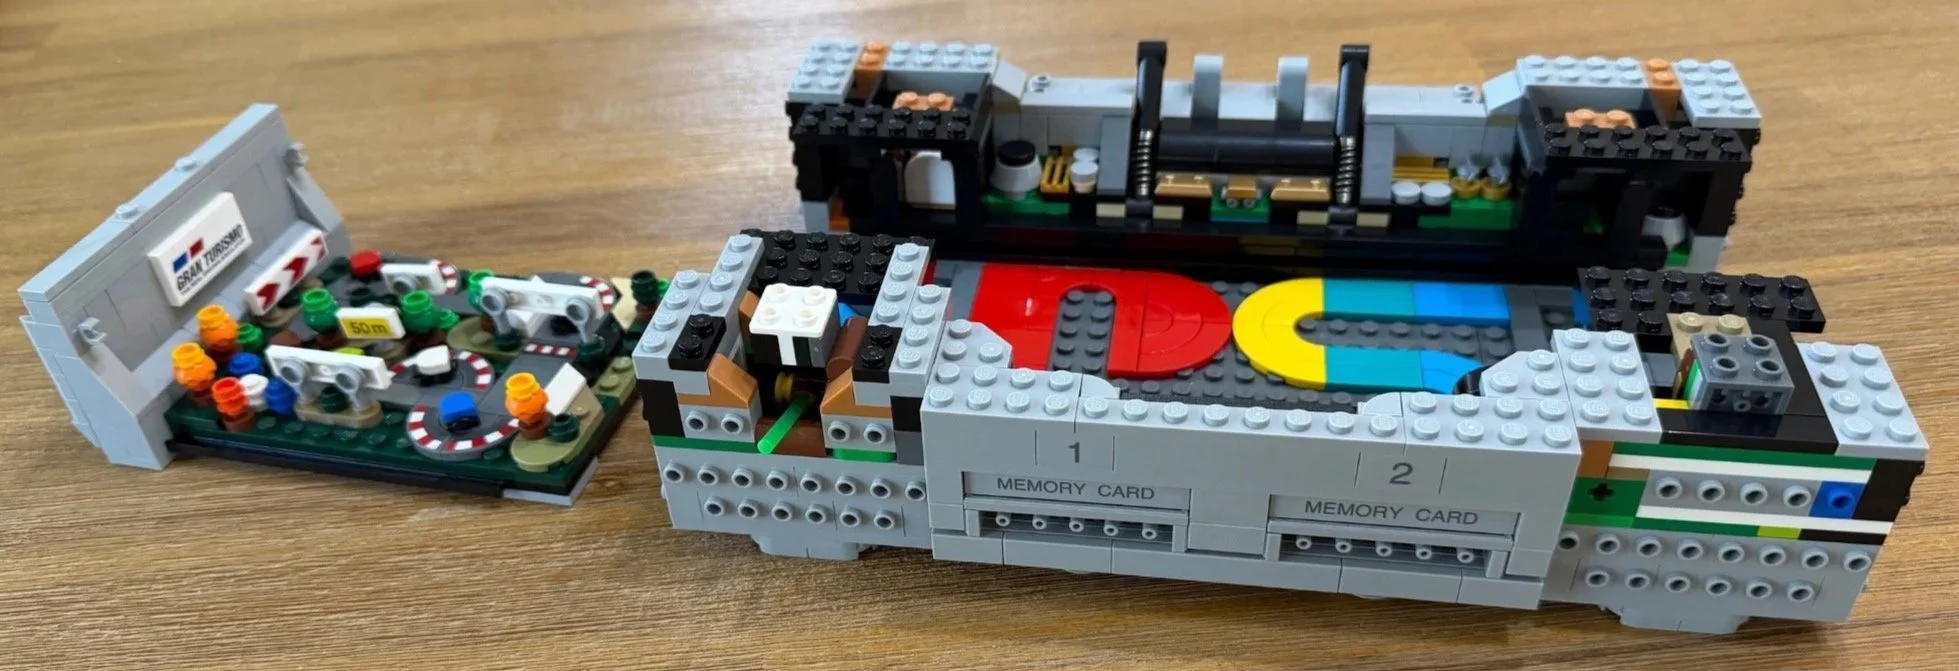
The printed controller-port numbers, 1 and 2, are another welcome detail. Once the mechanisms were assembled, I had a good time testing the buttons.
Two different button assemblies kept Bag 6 interesting.
Bag 7 — The familiar gray shell arrives
Time: 09:57 · Difficulty: 2.2/10 · Repetition: 4.5/10 · Dexterity: 2.1/10
Black 4 × 10 plates (303026) help tie the shell together, and the printed Open, Power and Reset details bring the console’s identity into focus.
Sixteen light bluish gray Technic 1 × 4 gear racks (6457283) create the vent texture. Here their teeth are doing visual work rather than driving a mechanism. It’s a clever use of a familiar part, and the repeated placement is easy to settle into.
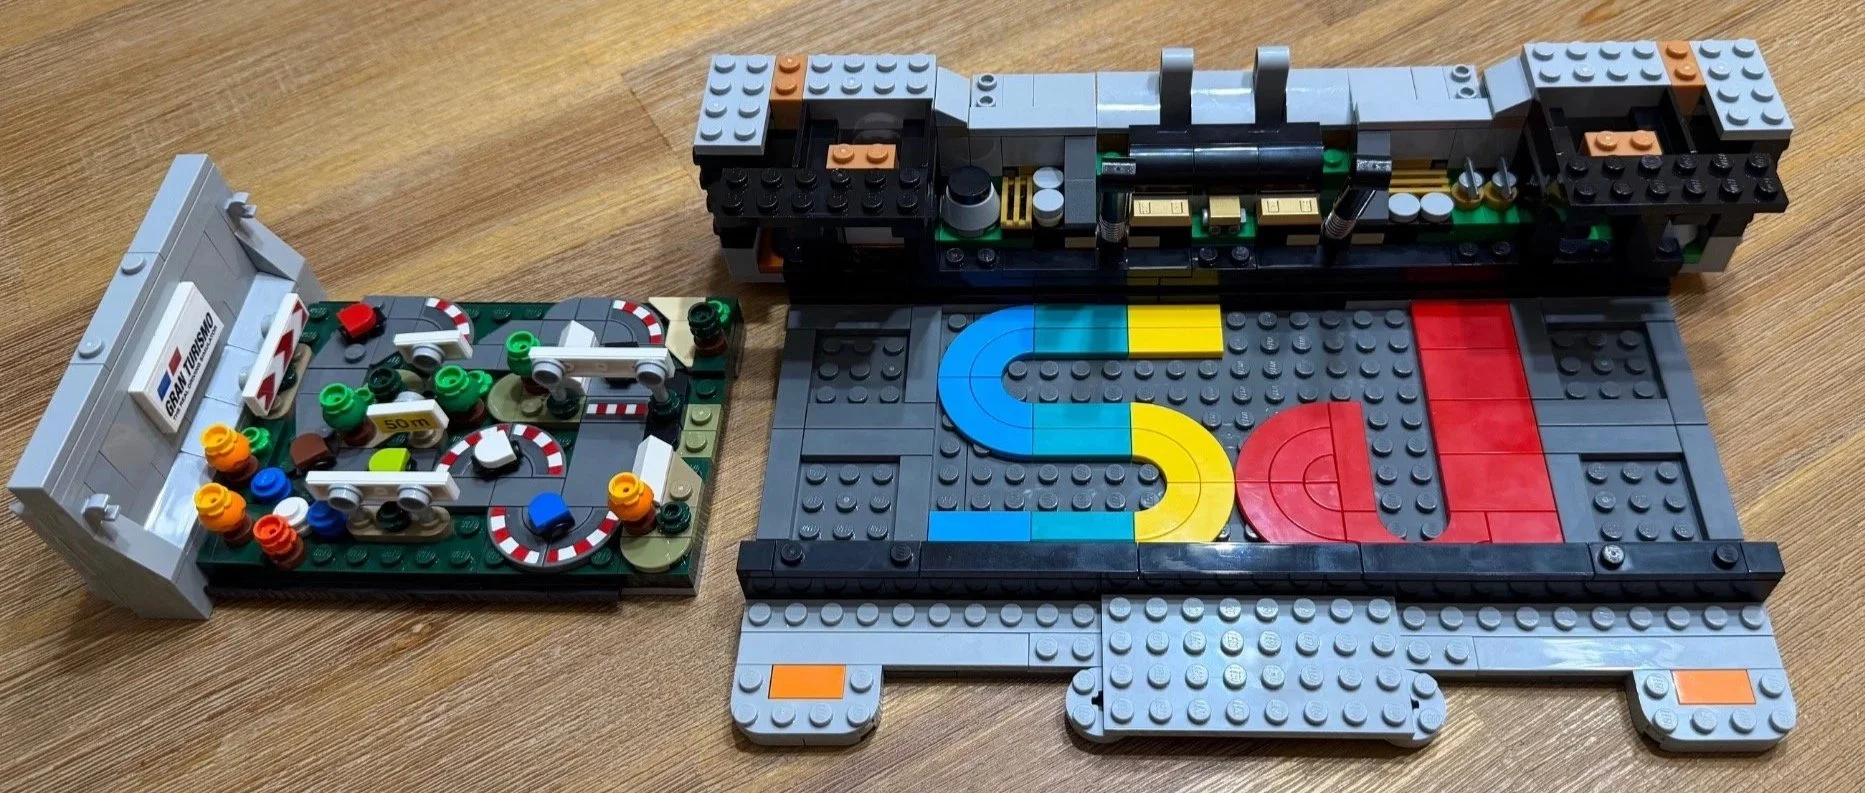
The Gran Turismo scene slides into its compartment smoothly. Seeing it tucked inside the increasingly recognizable console is a great payoff.
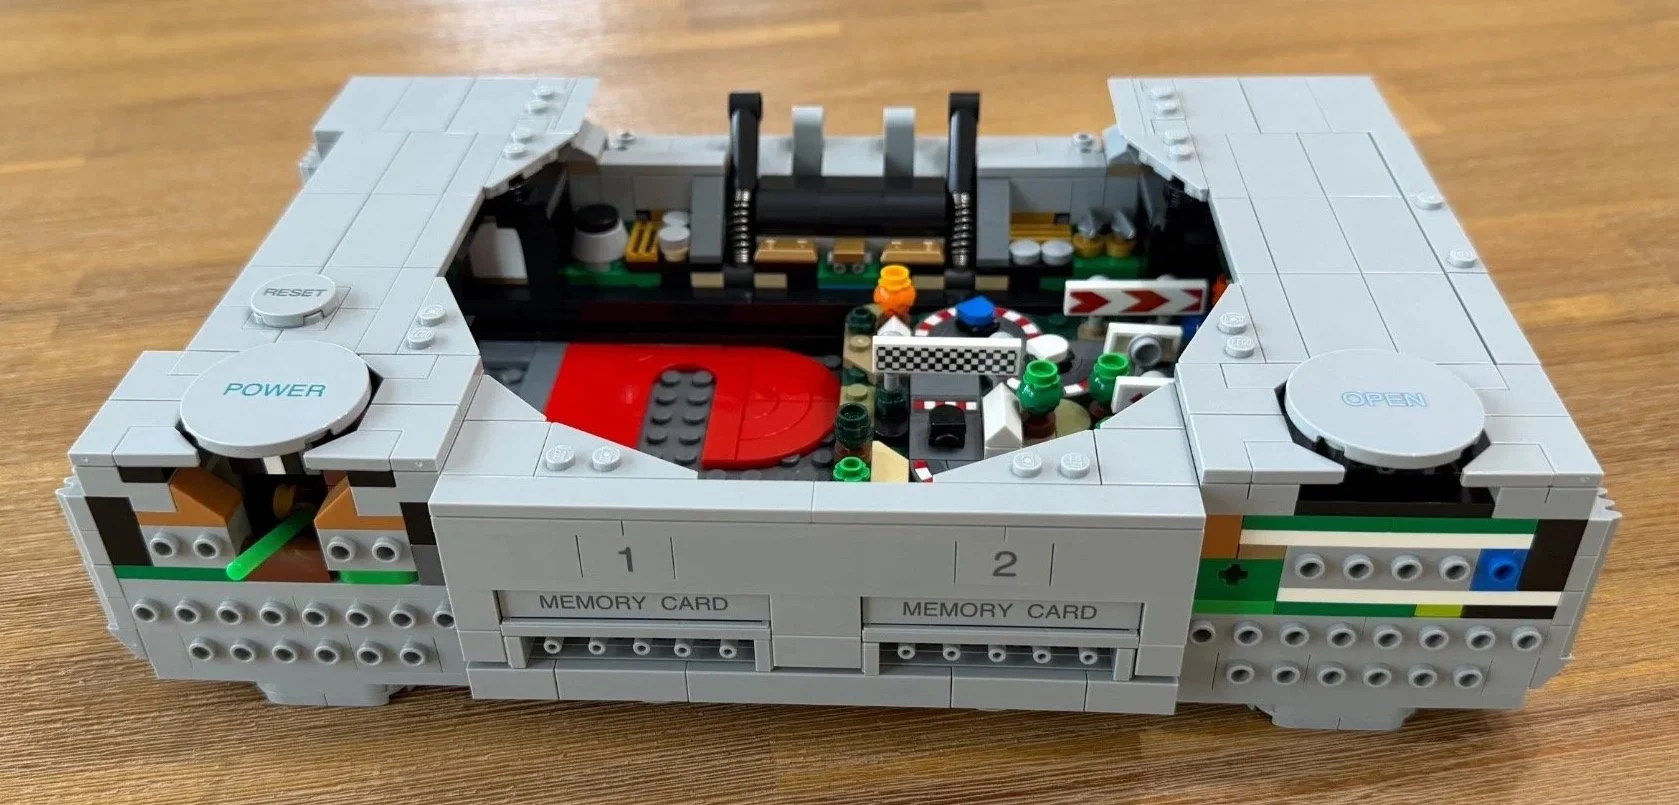
The printed buttons and vent texture bring the familiar shell into focus.
Bag 8 — Ape Escape and its changeable helmet
Time: 20:28 · Difficulty: 5.5/10 · Repetition: 4.5/10 · Dexterity: 7.2/10
The second micro scene arrives after several console bags, which gave me a welcome break between the two tiny builds. I found Ape Escape less meticulous than Gran Turismo, though its small parts still needed care. The scene builds up terrain, water, palms, a chest and a little ape. I applied two stickers here.
The ape looks a little awkward to me, but the helmet is a neat touch. You can swap its red and blue top pieces: blue represents a calm, unaware ape, while red signals that it has noticed you and may flee or attack. The unused top stores in the chest. That’s a useful little detail to know before putting the scene away.
The banana-themed printed tiles add to the setting. I initially thought of them as collectibles; I wouldn’t label them that way now. The booklet doesn’t identify their exact gameplay role, and Ape Escape also uses banana-peel hazards.
Ape Escape has another interesting link to PlayStation history: it required the DualShock controller. The controller included in this LEGO set represents the earlier design without analog sticks. The two therefore celebrate different moments in the console’s life.
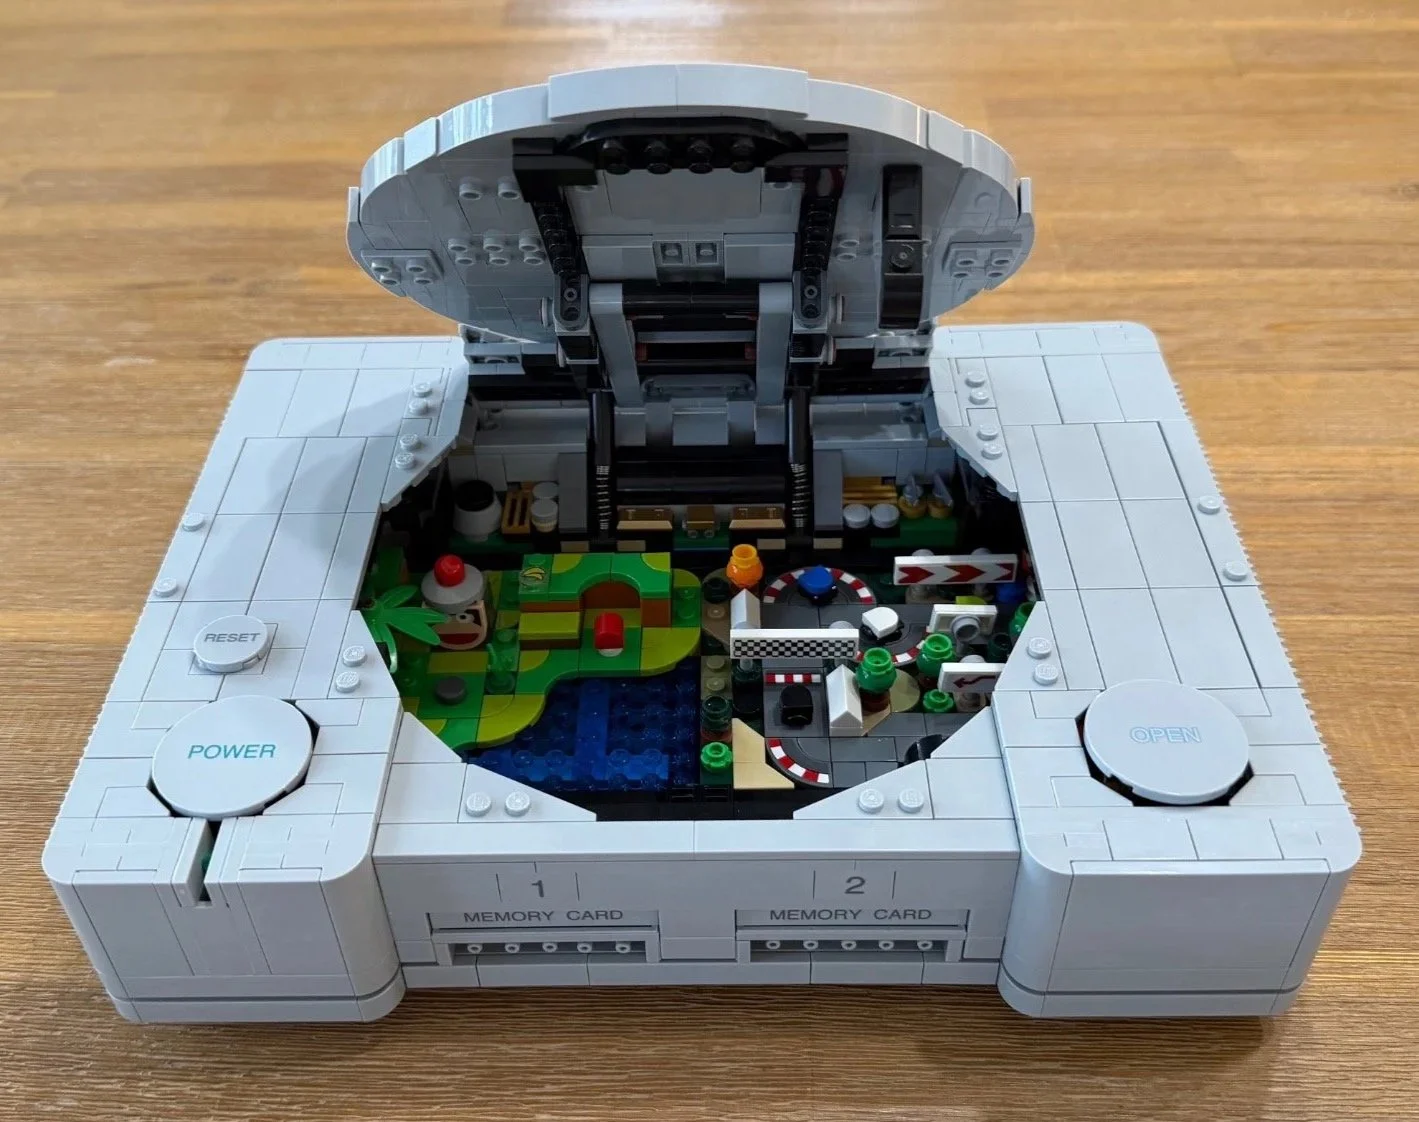
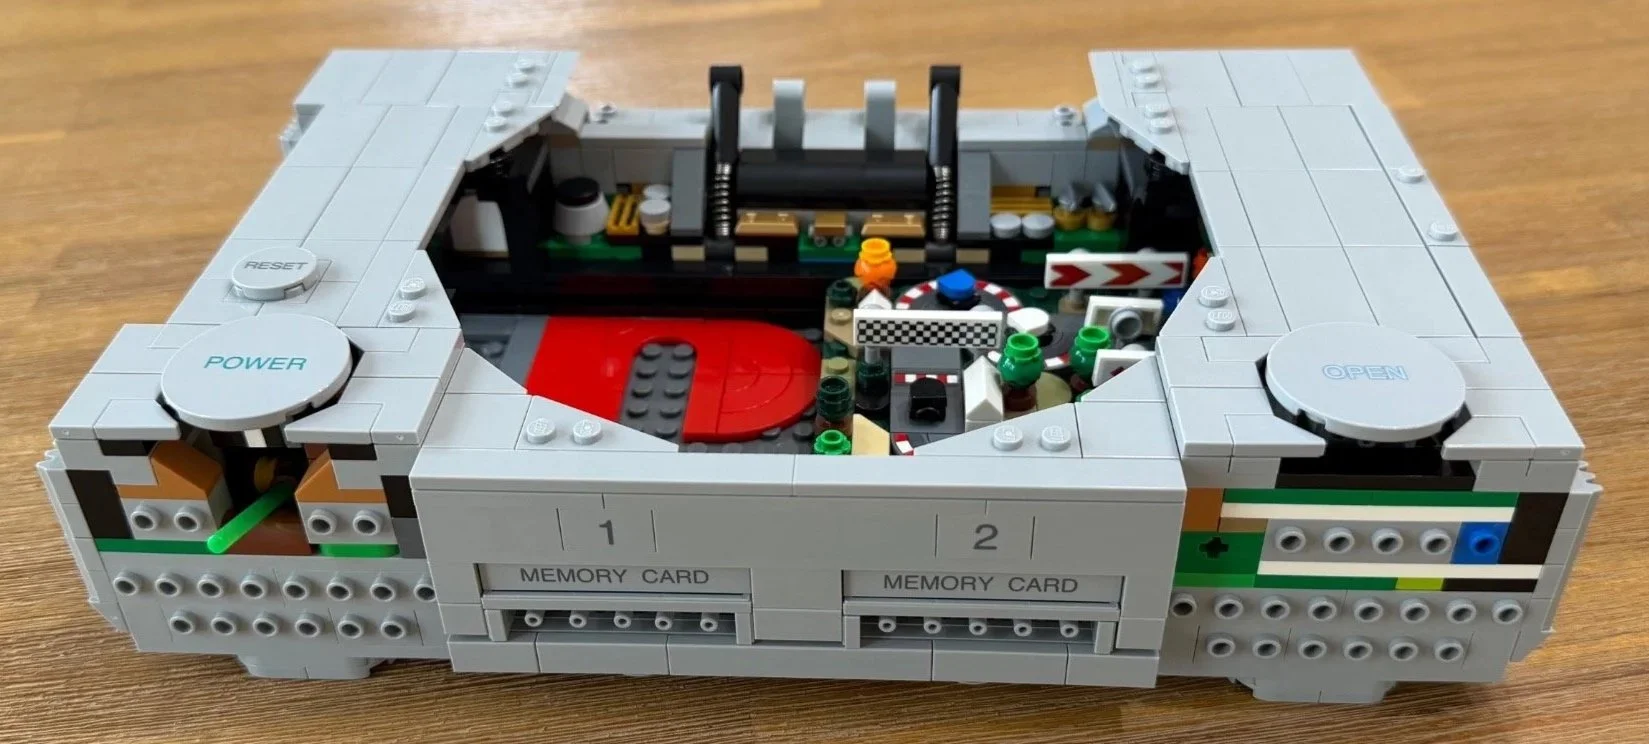
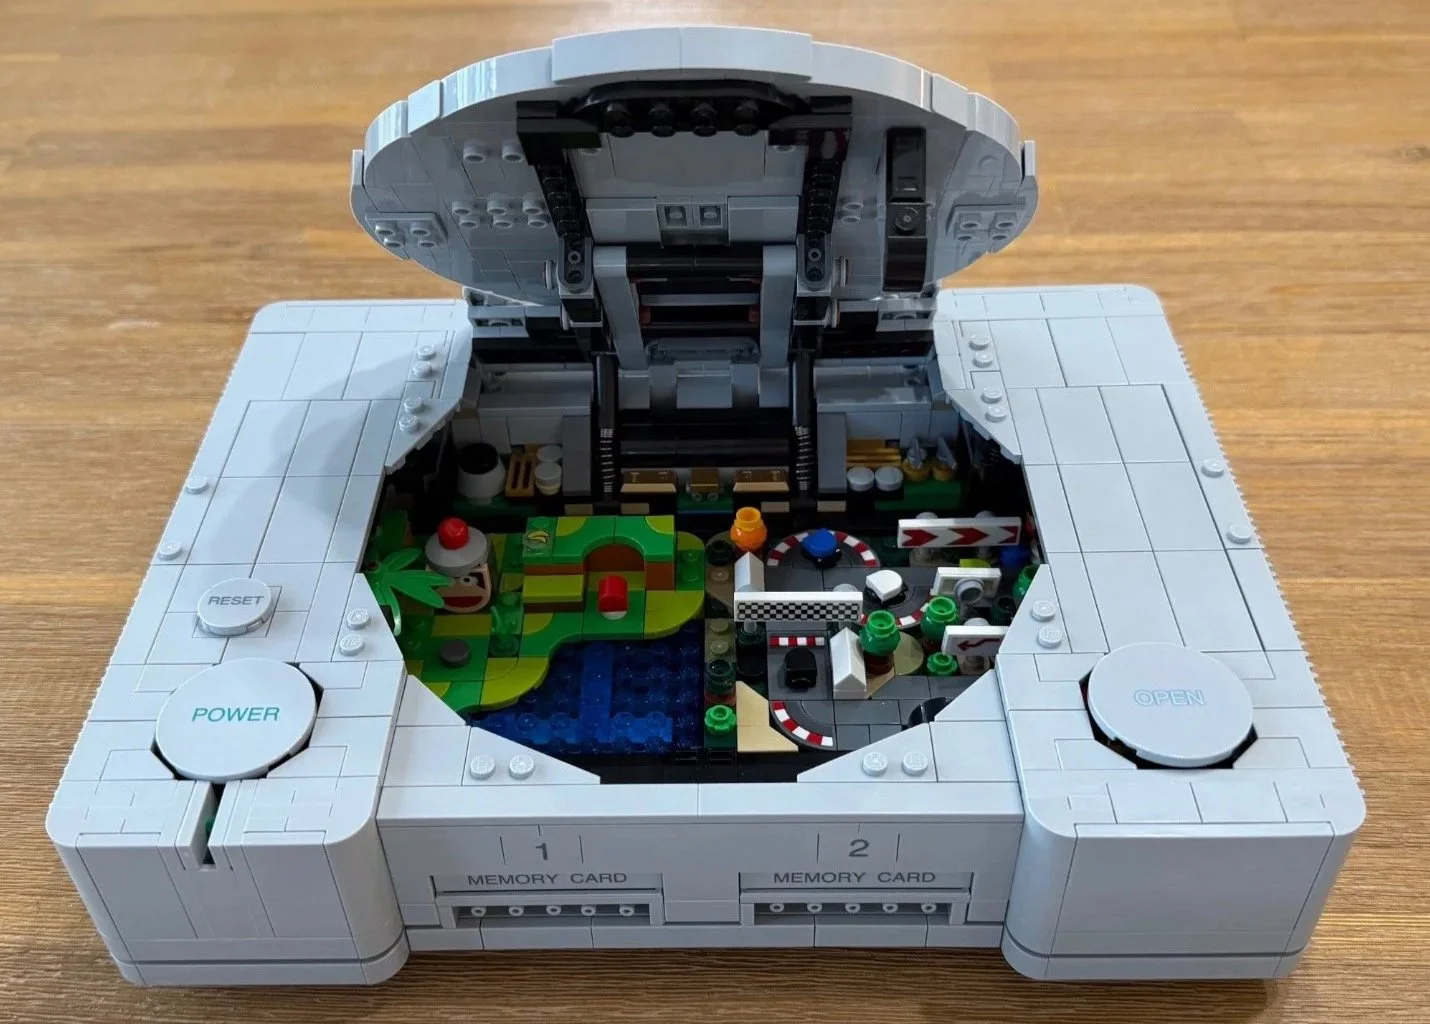
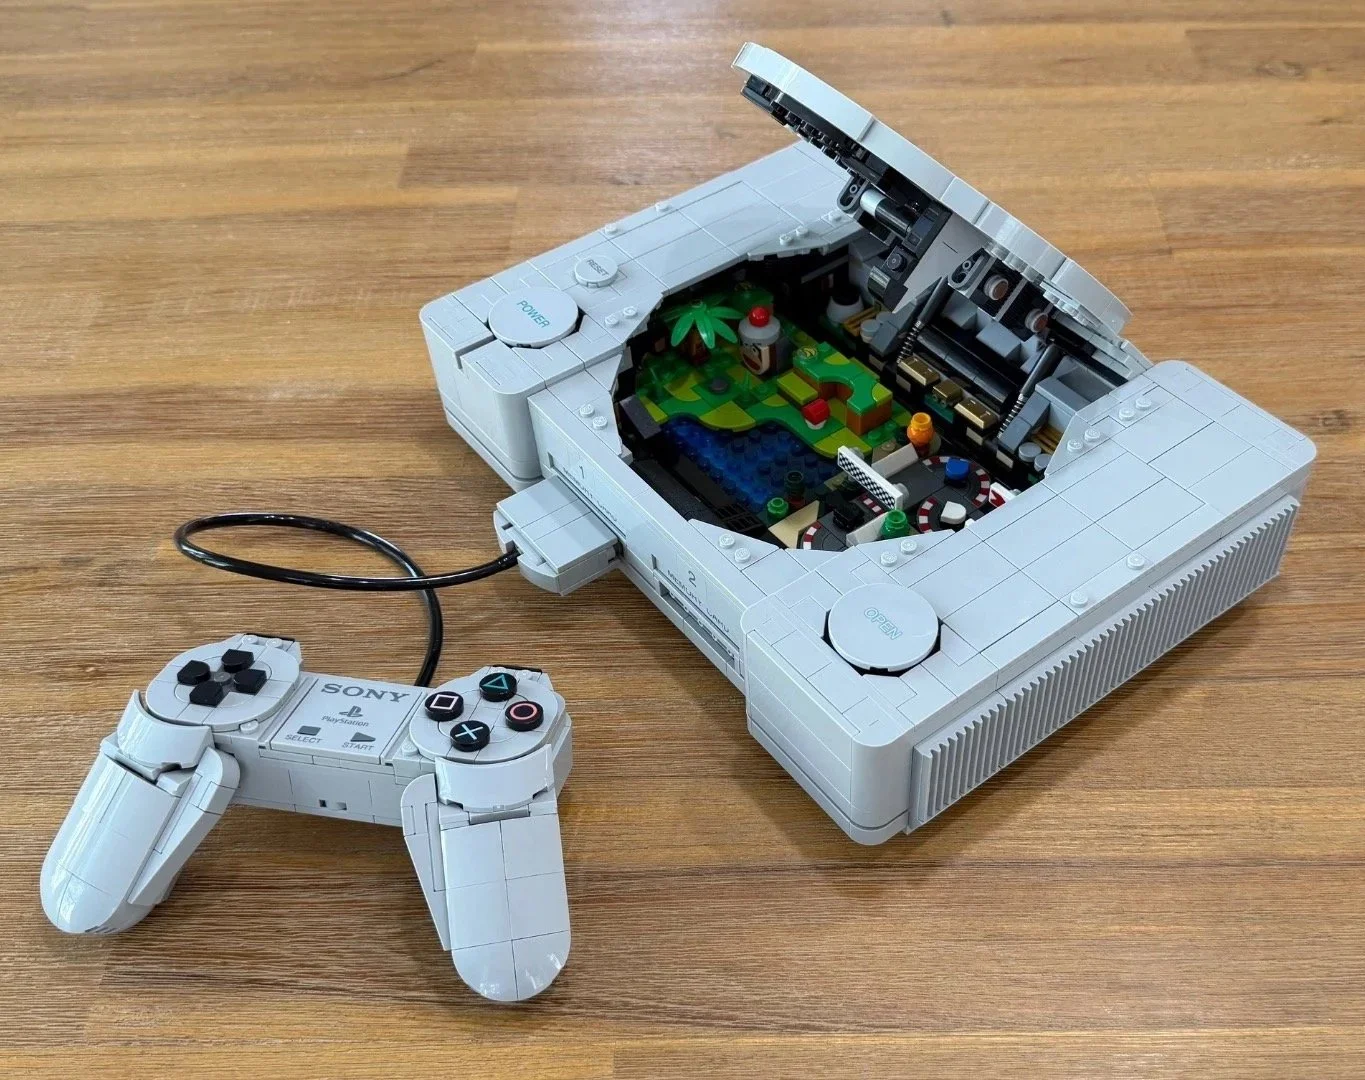
A later look at the finished console shows Ape Escape beside Gran Turismo under the lid.
Bag 9 — Repeated edge work and firm connections
Time: 11:08 · Difficulty: 2.8/10 · Repetition: 7.1/10 · Dexterity: 6.5/10
This bag fills out more of the corners and rear-port area, including the power connection. The instructions begin with four matching trim subassemblies, then spread the remaining edge work across several steps. There’s repetition, but the rhythm kept it from becoming dull for me.
Six red 2L bars with stop rings (6399645) secure the edge assemblies. On my build, fully seating them took a firm press and was hard on my thumbs. That concentrated connection effort is why my dexterity score is much higher than my difficulty score here. Support the assembly while pressing so you don’t push another piece loose.
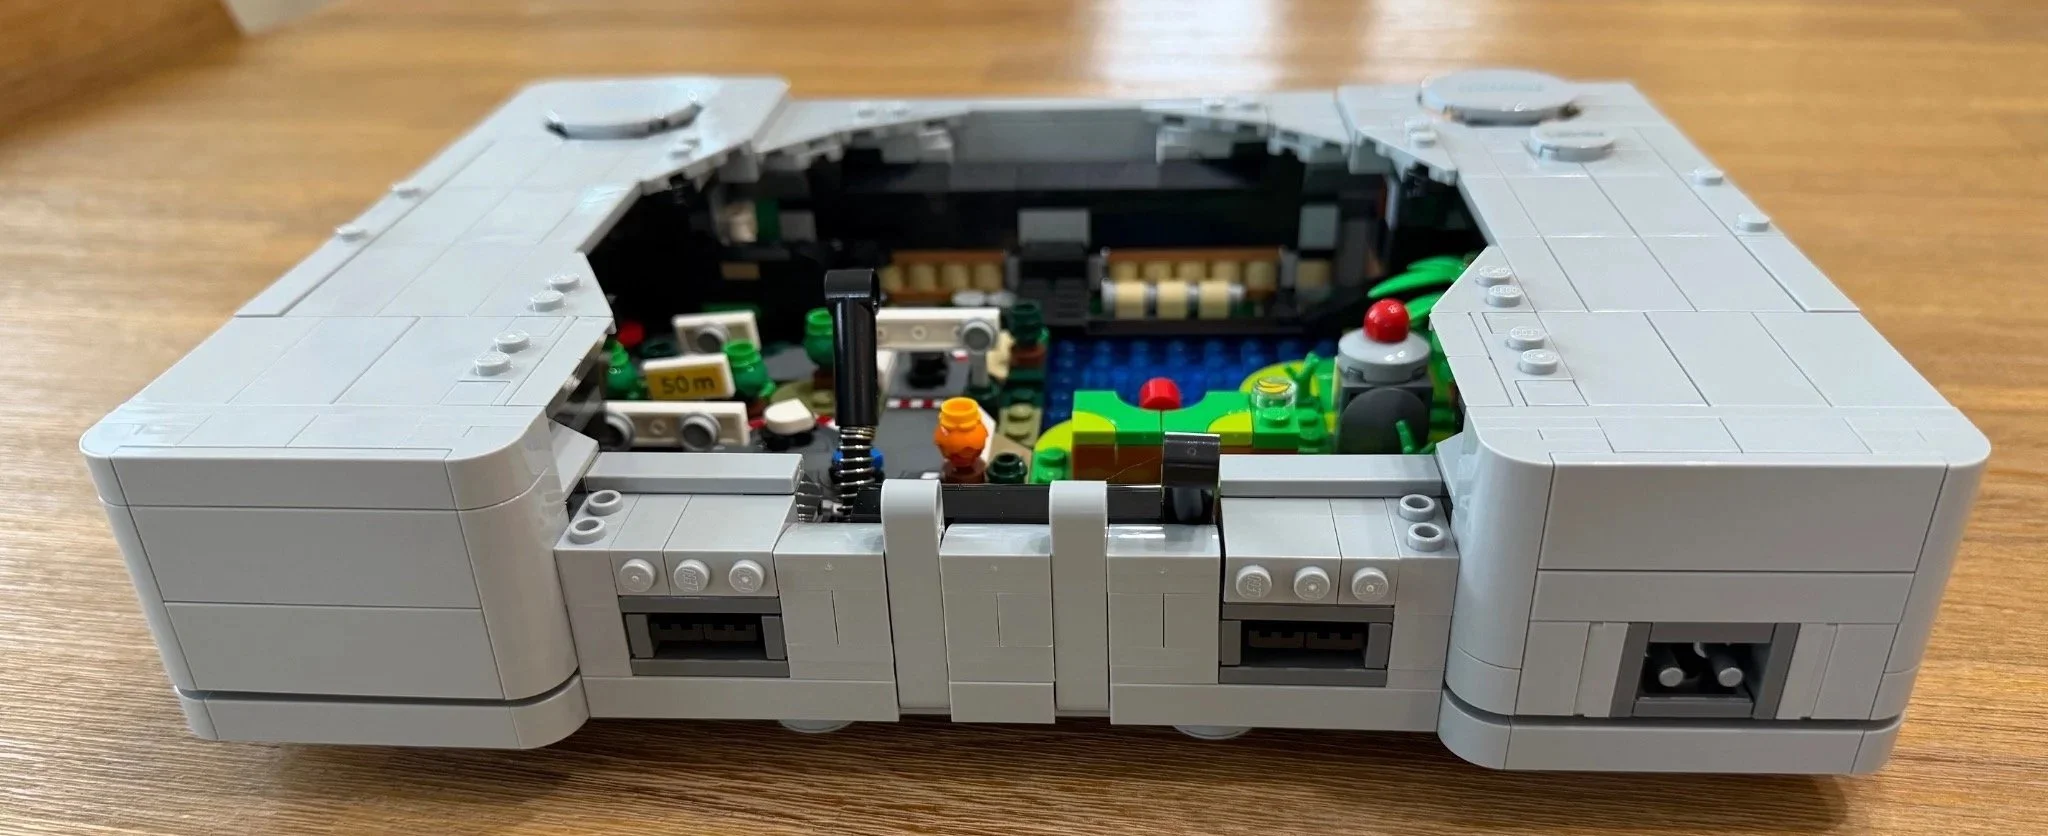
The repeated edge work adds shape and detail around the back.
Bag 10 — My toughest mechanism bag
Time: 15:12 · Difficulty: 7.0/10 · Repetition: 5.5/10 · Dexterity: 9.2/10
The Power-button corner comes together, and pressing the button moves the translucent green indicator into view. It gives the impression of the console turning on through a mechanical action; it isn’t an electronic light. This was my biggest surprise of the build.
On my copy, the green piece was slow to return to its resting position. I still enjoyed the feature, but it needed more patience than a quick press-and-release.
The lid arm follows, using Technic beams and connections that deserve a careful look at the instruction diagrams. Four light bluish gray 3L Technic pins without friction ridges, with stops (6338962), help form the moving assembly. Their smooth pivoting connections were easier to manage than forcing in another tight pin. This bag gave me the greatest combination of mechanism work and awkward handling.
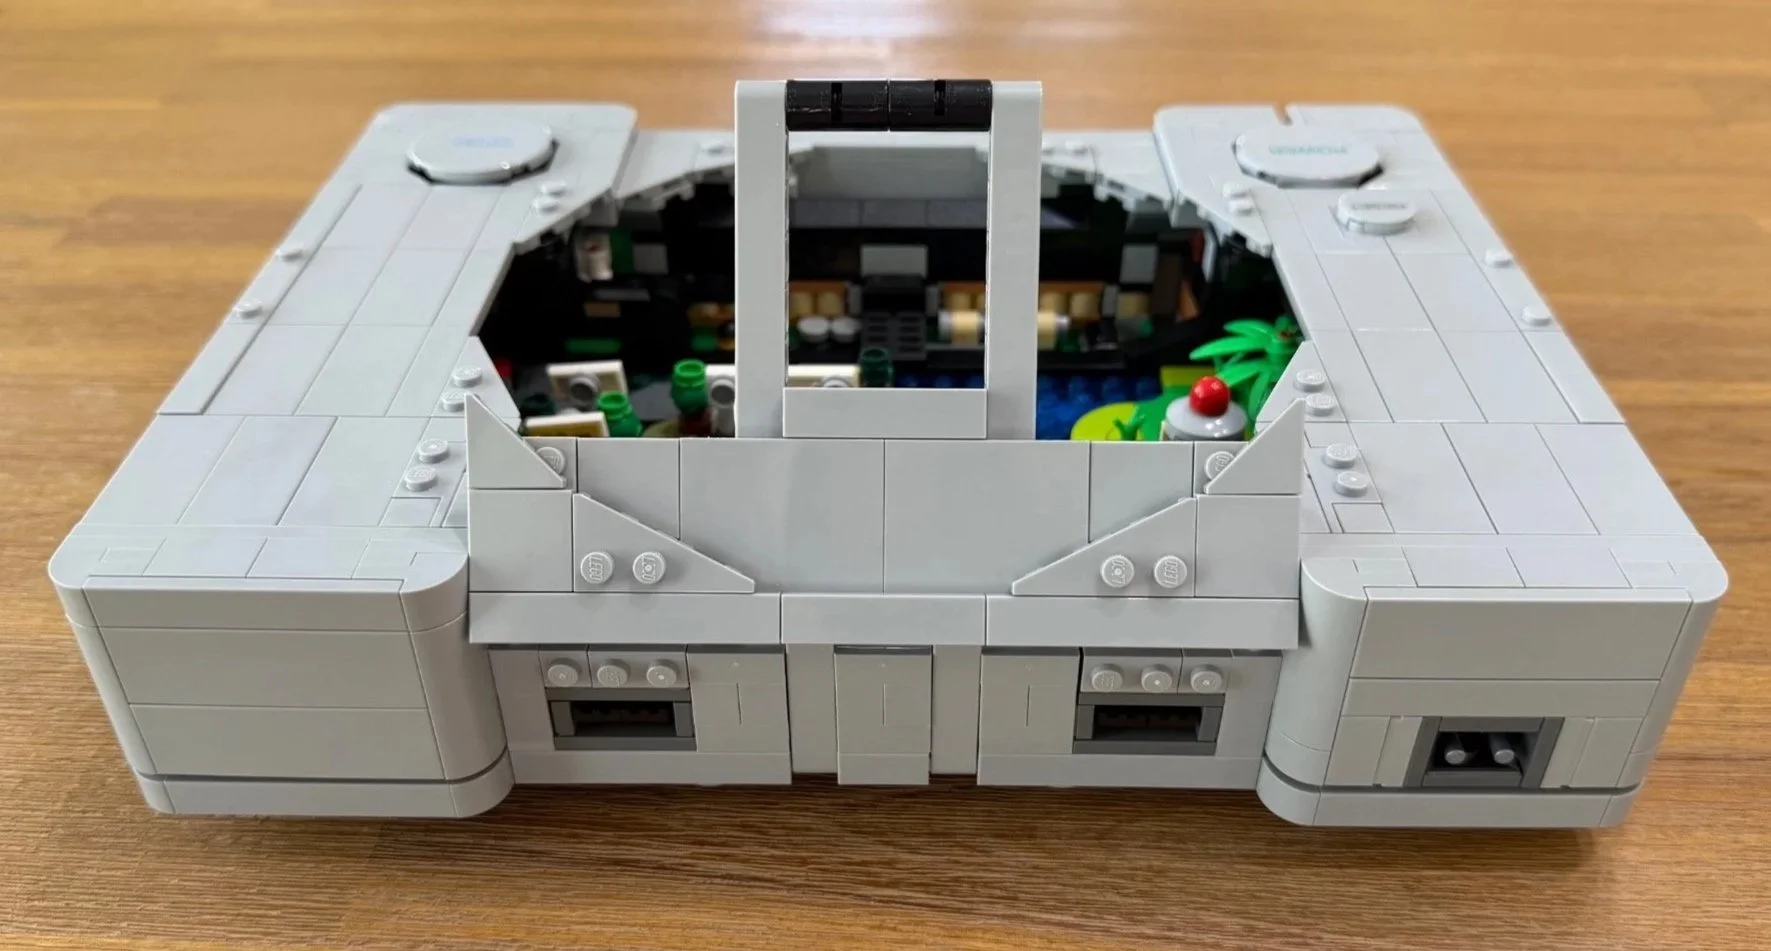
The disc-lid arm was the most demanding mechanism stage for me.
Bag 11 — The disc lid completes the console
Time: 16:37 · Difficulty: 5.0/10 · Repetition: 6.7/10 · Dexterity: 6.0/10
The circular lid uses repeated curved sections. They look excellent when joined, but the growing lid can be weak while you’re still adding pieces. I supported it as I worked rather than letting an unfinished section take the pressure of the next connection.
The Sony and PlayStation branding finish the familiar top. Attaching the lid to the mechanism was easier than I expected; check its orientation before seating the four Technic connections.
My Open button initially caught in its pressed position, and I had to release it before the lid would close. It stuck less as I used it. That’s an observation from my assembled copy, rather than a claim that every set behaves this way. Even with that quirk, the completed console looked fantastic.
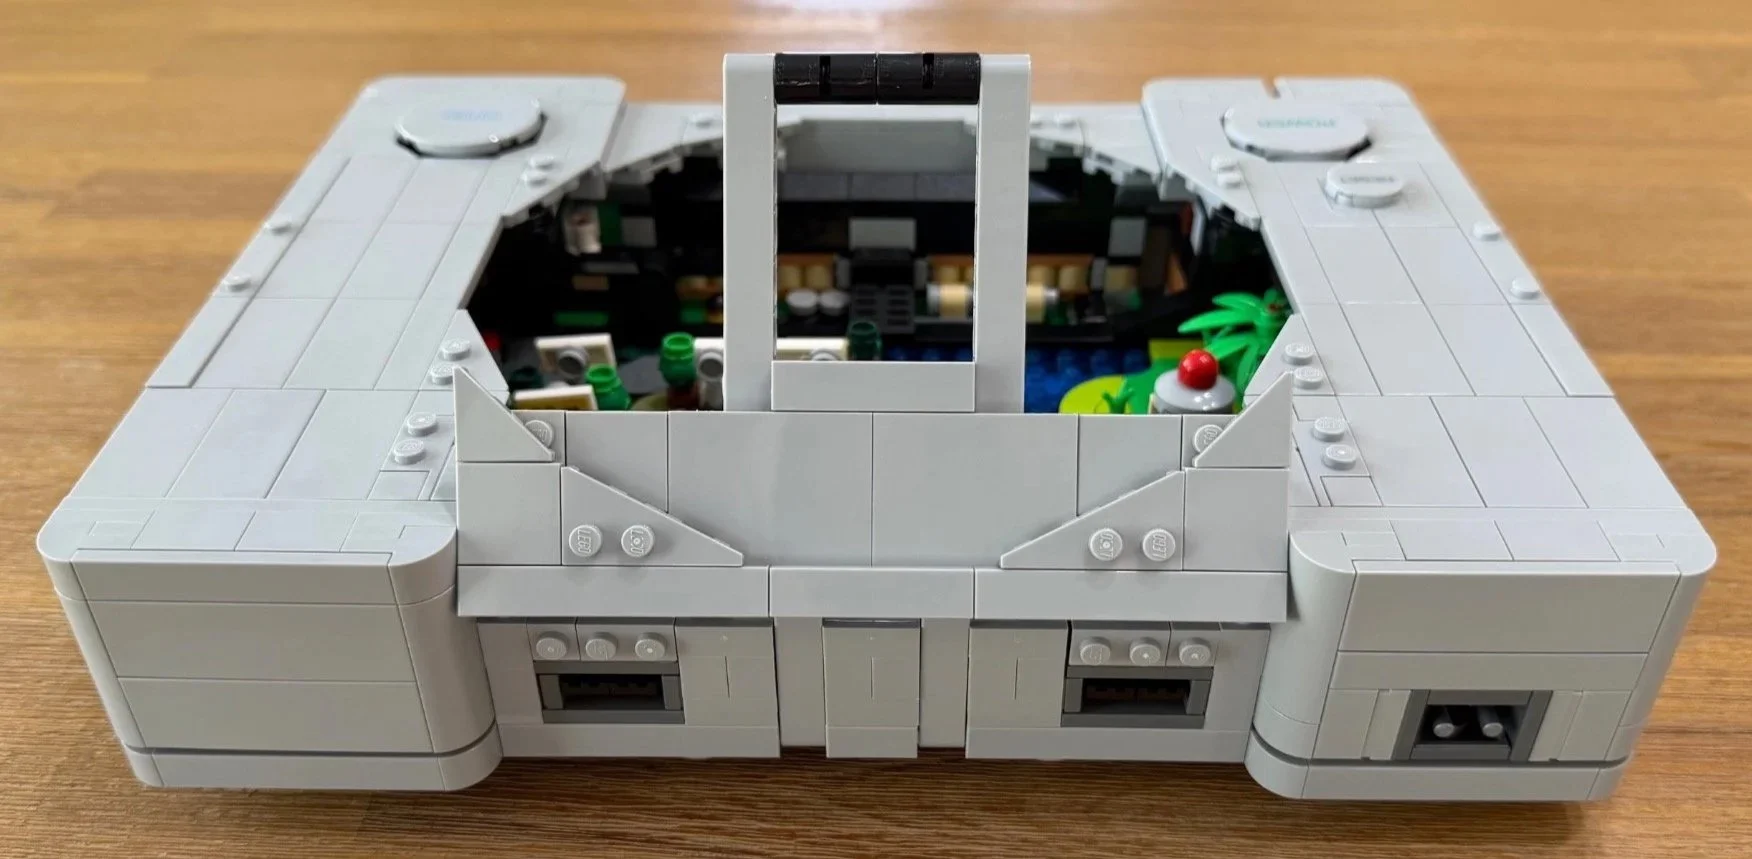
A short, silent look at the disc lid opening and closing on my completed console.
Bag 12 — An instantly recognizable controller
Time: 08:51 · Difficulty: 2.4/10 · Repetition: 4.5/10 · Dexterity: 2.1/10
After the console mechanisms, starting the controller felt pleasantly straightforward. Its shape appears quickly, even before the controls and handles are finished.
Twelve light bluish gray 1 × 3 inverted tiles with center holes (6251044) are part of this stage. They introduce repeated placements, but the controller was taking shape so nicely that I didn’t mind. This was my shortest timed bag.
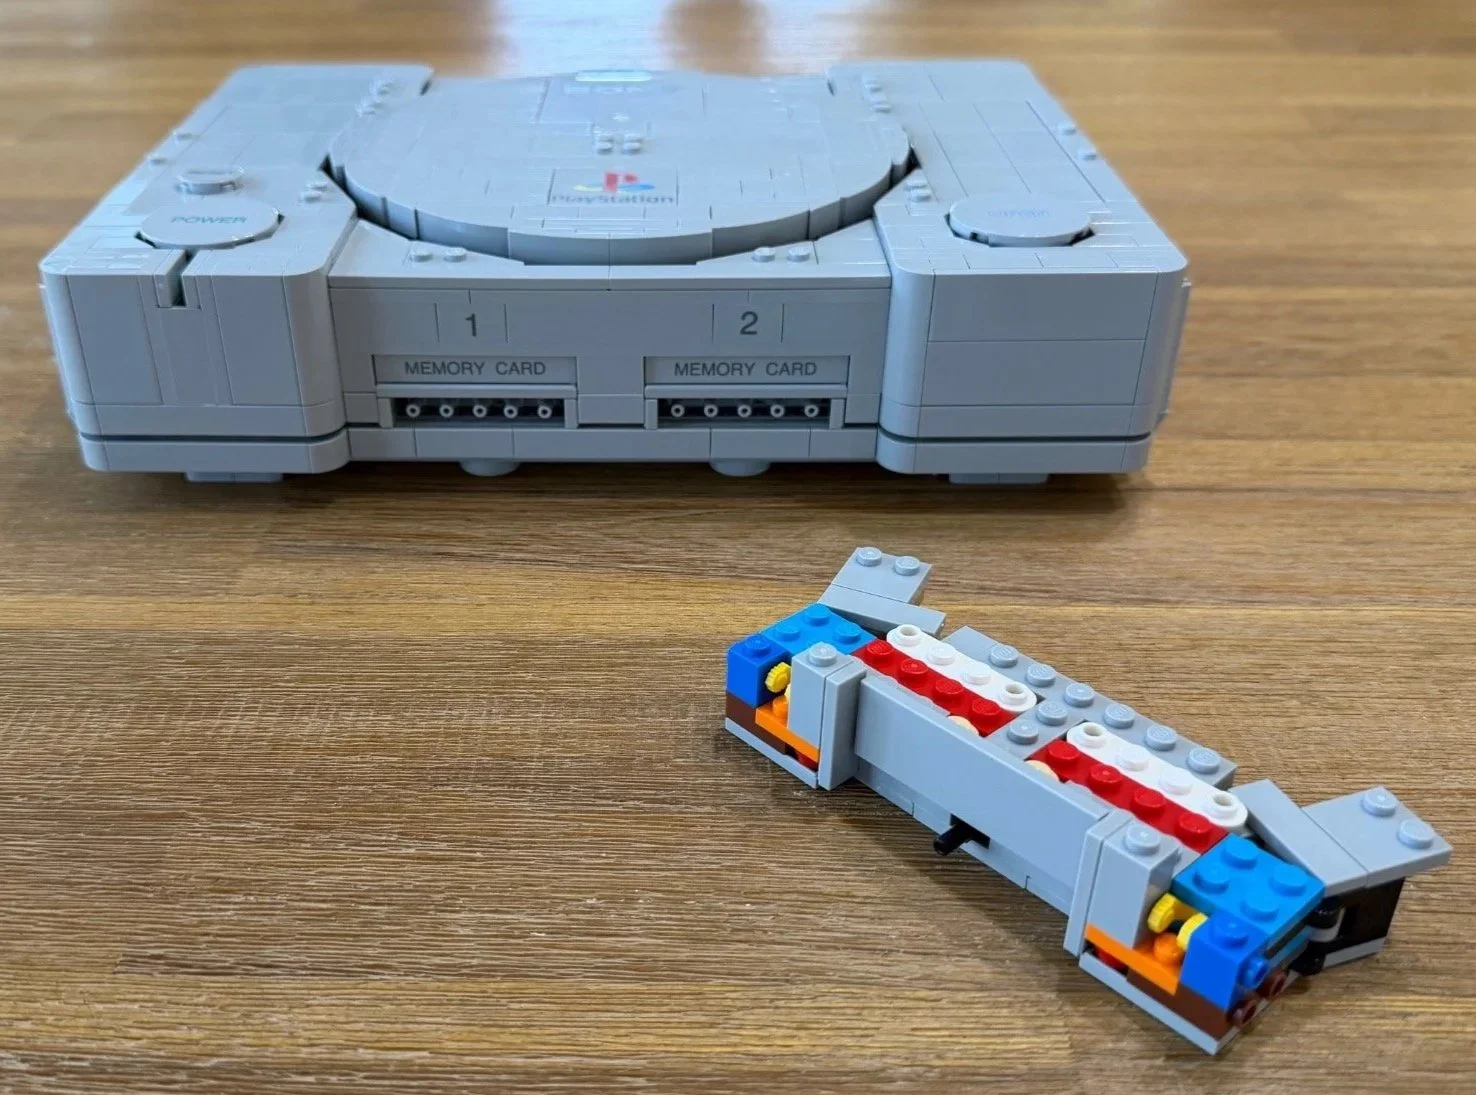
The controller’s shape is recognizable before its controls and handles are finished.
Bag 13 — The buttons I remember
Time: 15:20 · Difficulty: 2.3/10 · Repetition: 5.0/10 · Dexterity: 2.6/10
Seeing the circle, cross, square and triangle pieces spill out of the bag made me smile. The large center tile combines the Sony and PlayStation branding with the Select and Start details, and it looks sharp.
You add the directional pad, the face-button group, the shoulder controls and similar side assemblies. Their shapes work well at this size, but the main controls are static. I would have loved pushable buttons, especially after enjoying that sort of interaction in other LEGO gaming builds.
I found extra printed button pieces among my leftovers, which was welcome. I can’t say why the designer chose static controls, but I can say I wanted to press them. Even so, the controller became my favorite assembly in the set.
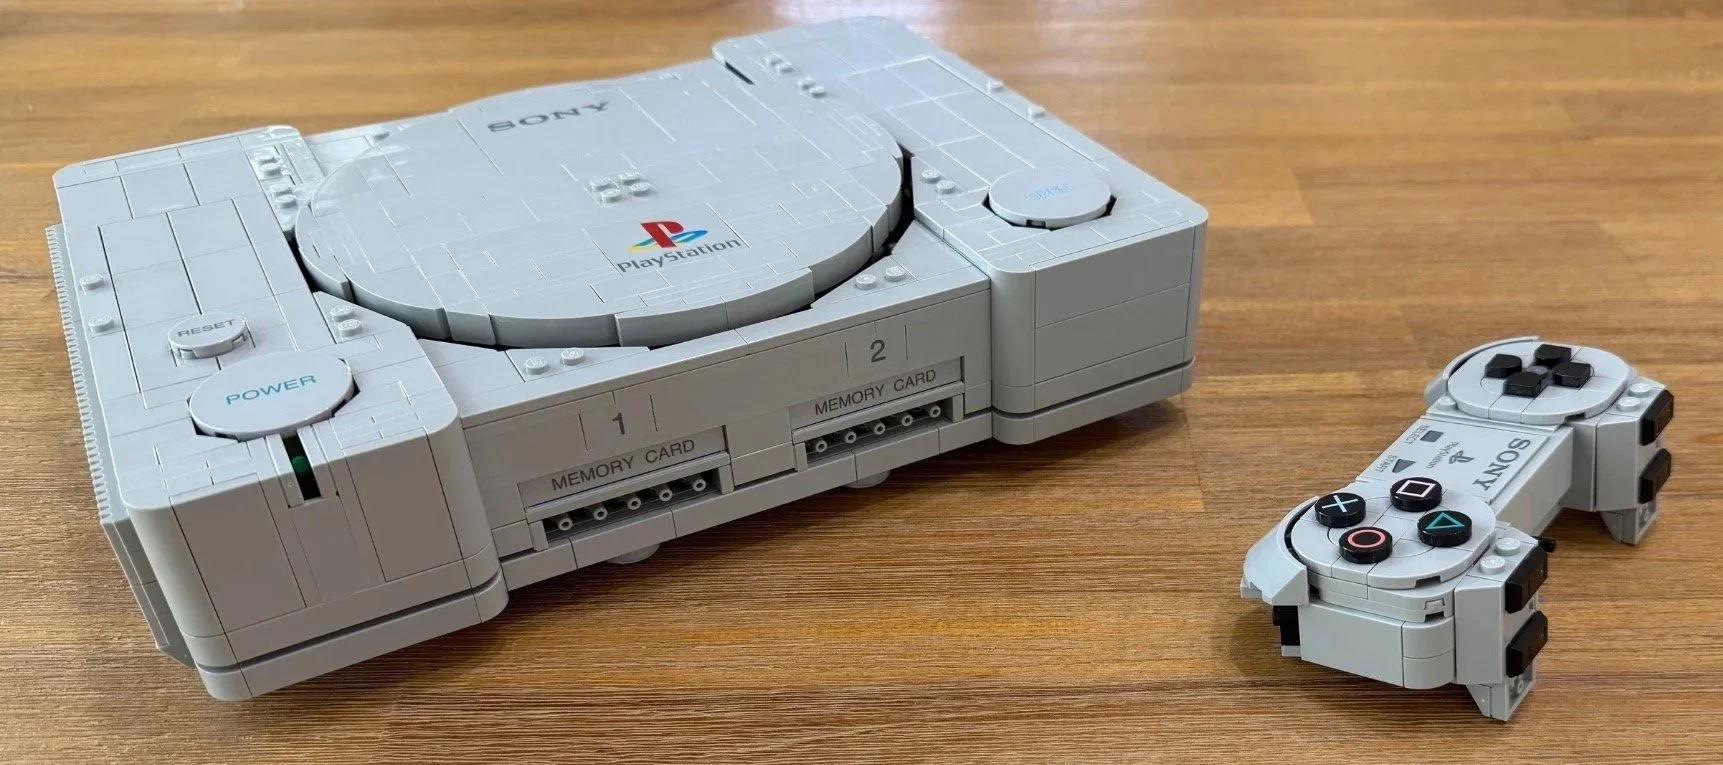
The familiar symbols make the controller feel complete before the final handles go on.
Bag 14 — Handles, plug and a tight cable fit
Time: 14:14 · Difficulty: 2.4/10 · Repetition: 6.0/10 · Dexterity: 6.6/10
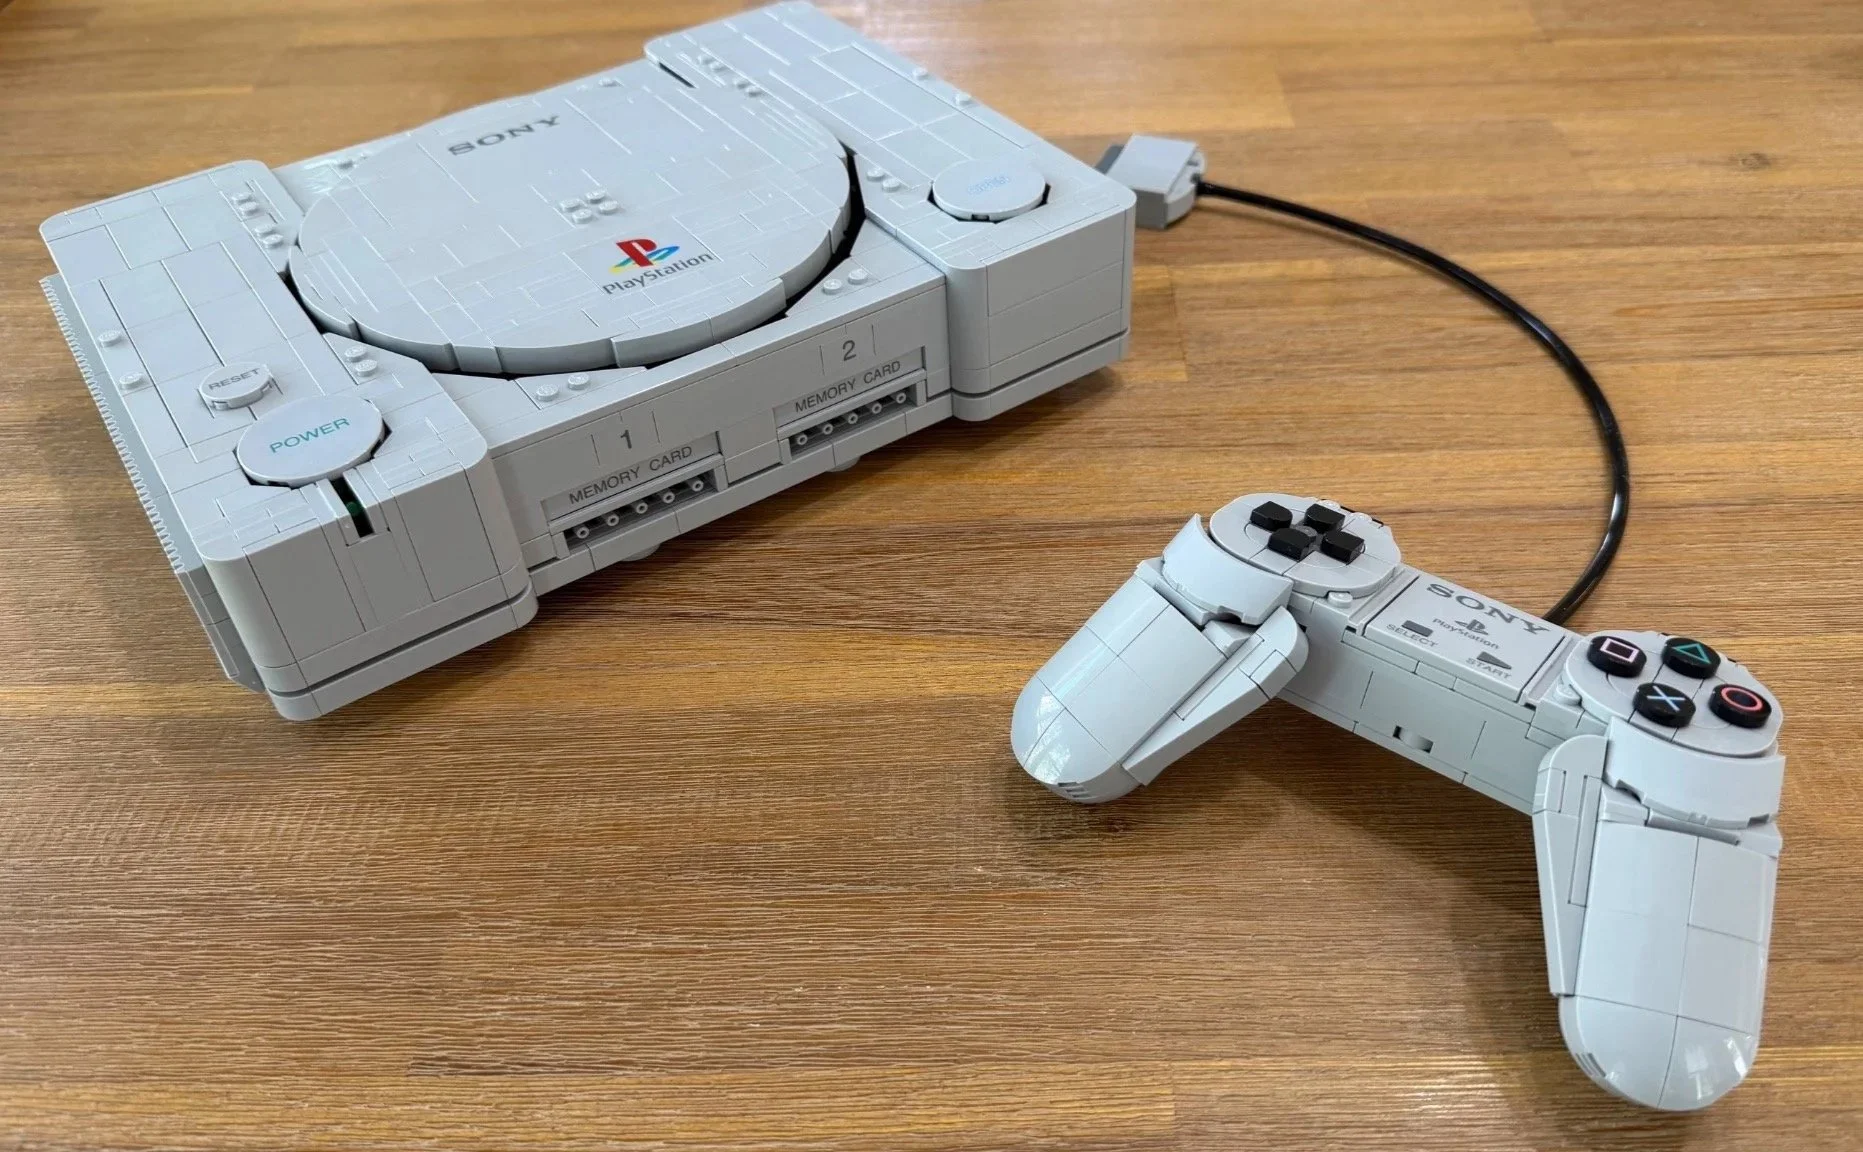
Two similar handle assemblies finish the controller’s silhouette. Then you build its plug and attach the flexible cable at both ends.
Those cable connections were the demanding part for me. The flexible material and tight fit made them harder to seat than the rest of the bag, so I worked carefully and supported the parts. Once attached, the connection felt secure. It’s a simple final bag overall, with a fiddly last task.
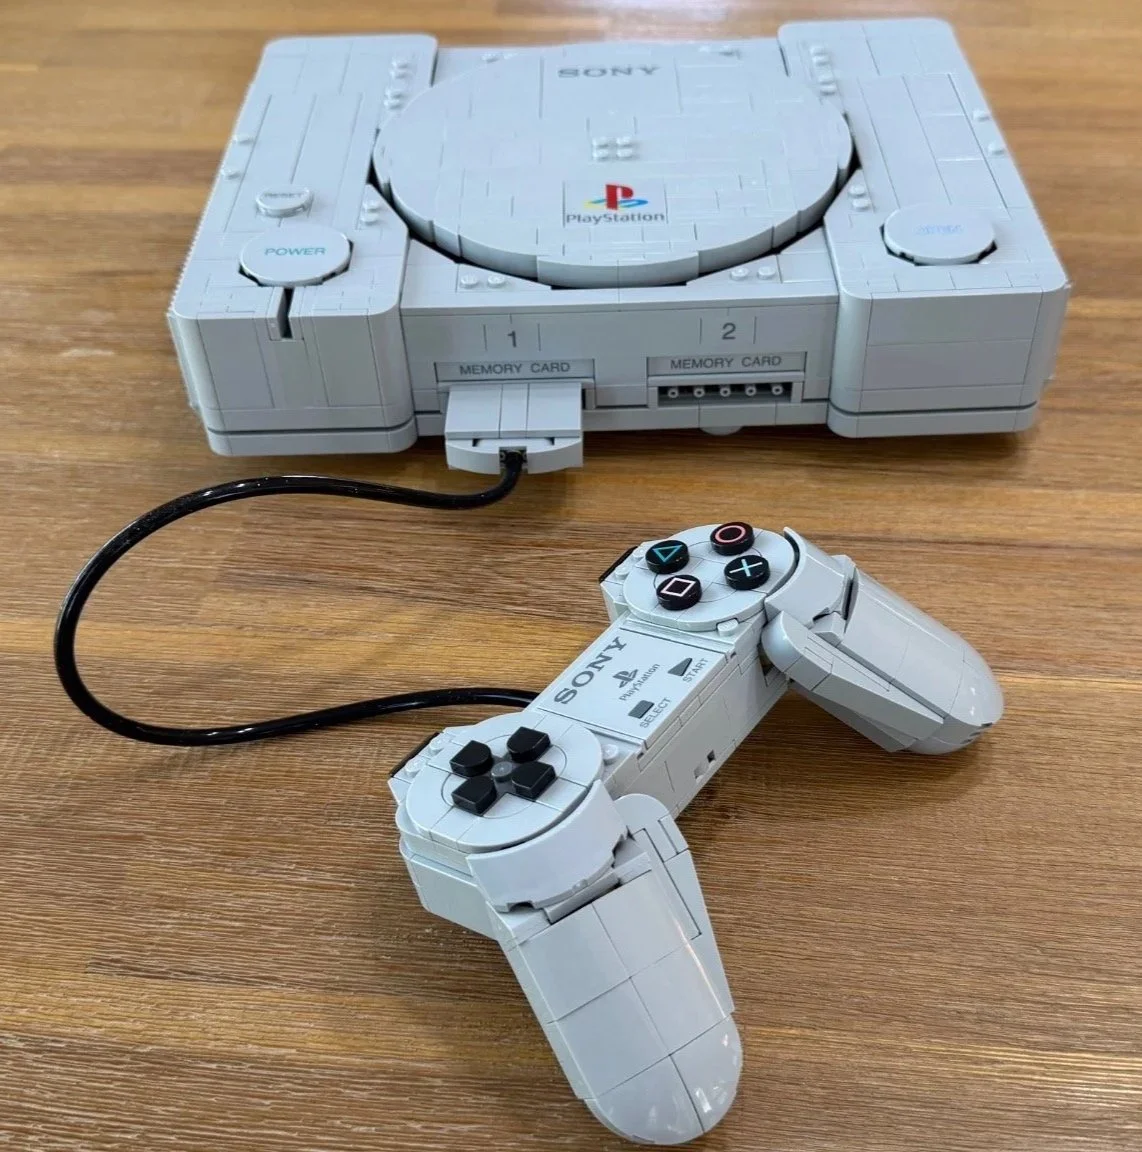
The controller cable connects to the console’s front port.
Details Worth Looking For
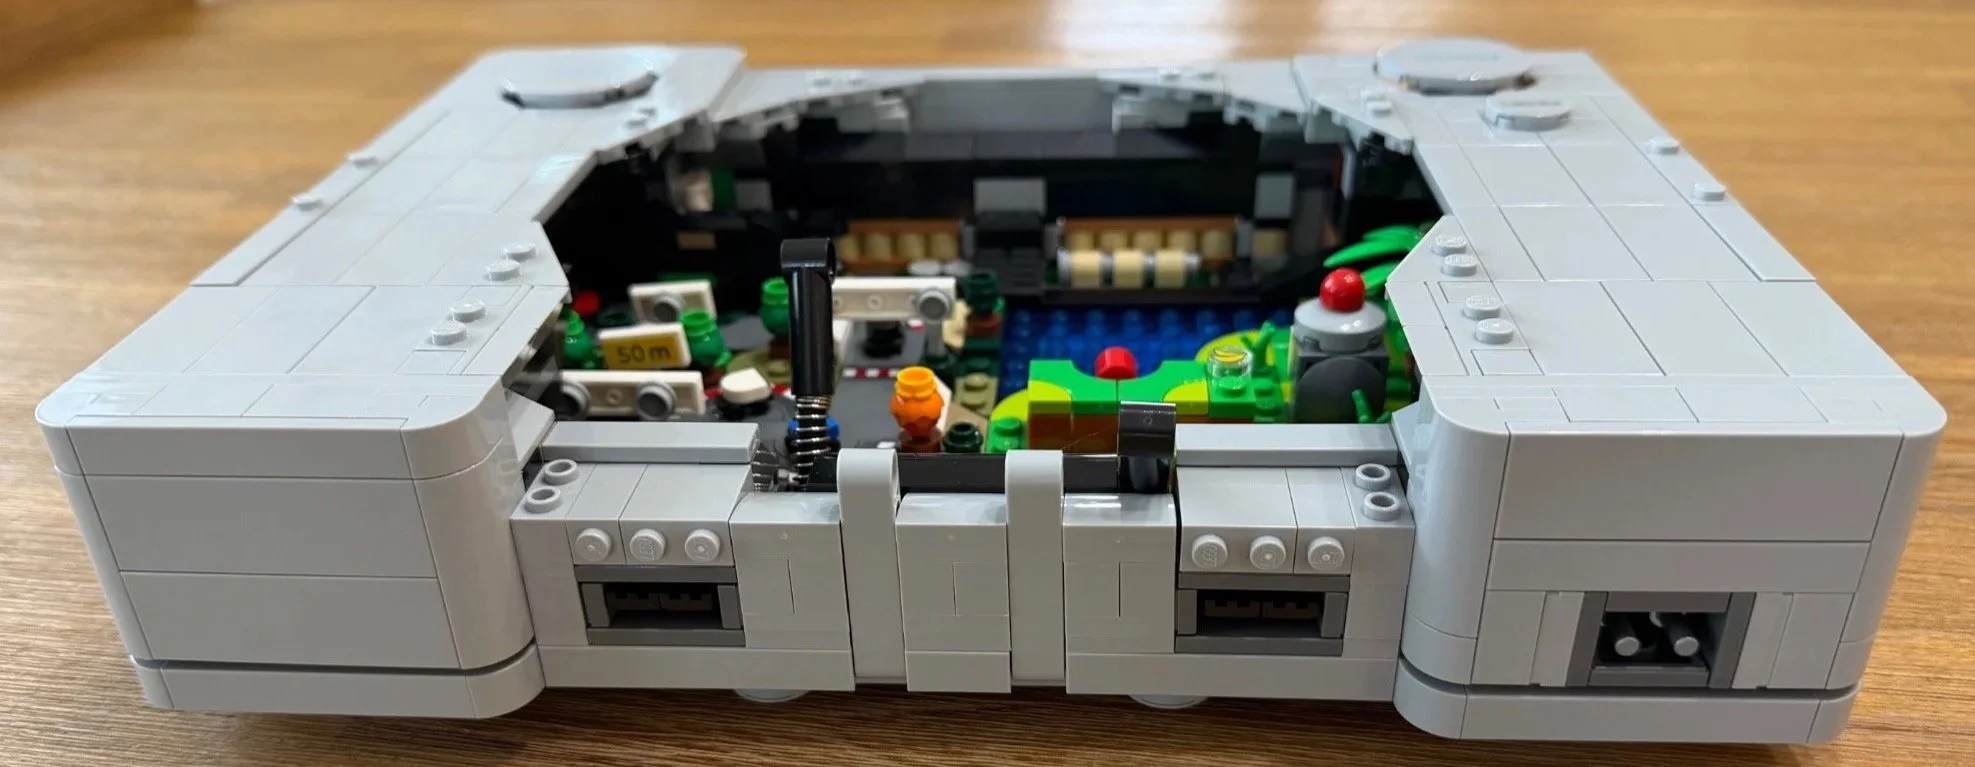
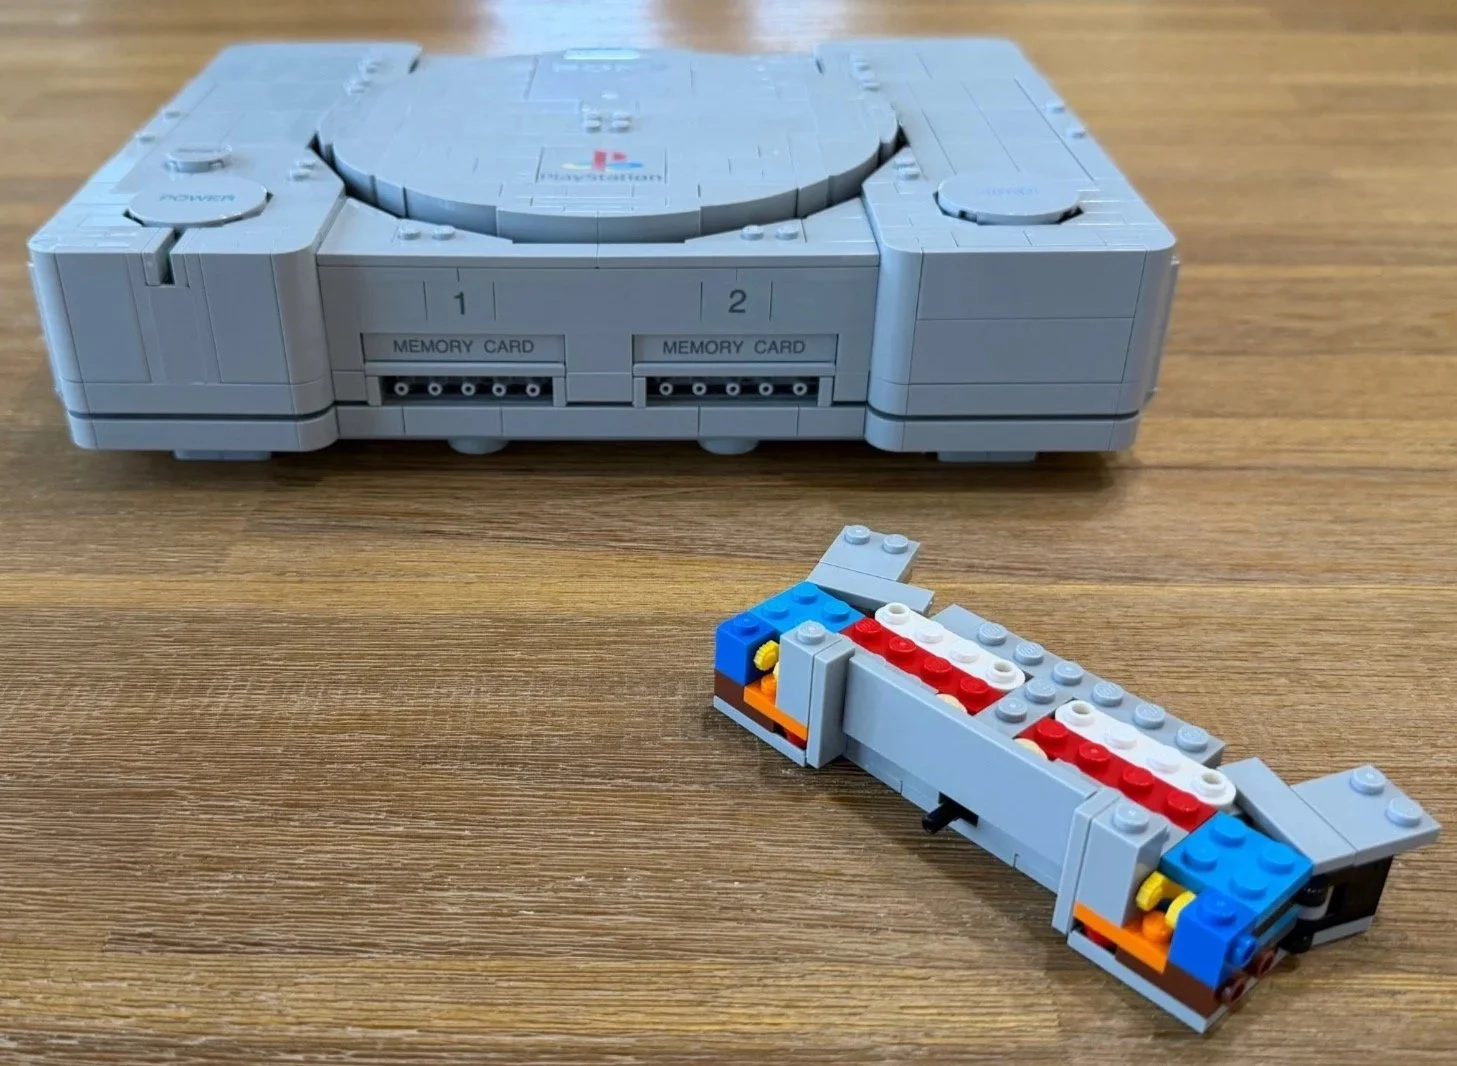
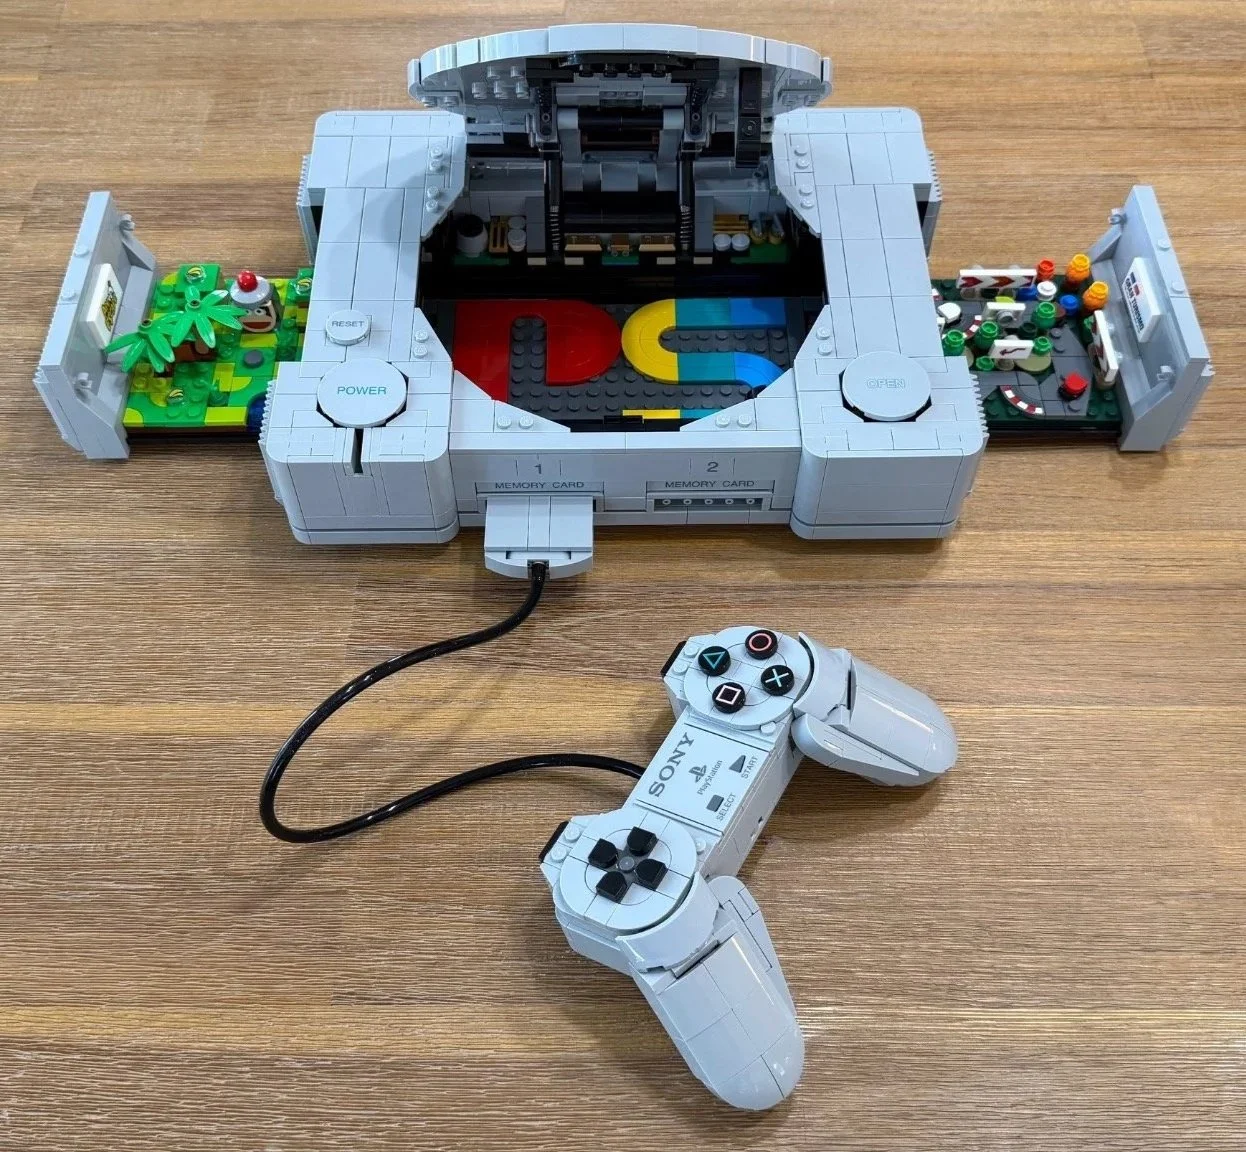
There’s more here than the closed-lid display suggests. The hidden multicolored PS logo is an early treat, and both game scenes can slide out for a closer look. The Ape Escape chest gives the spare helmet color a home instead of leaving it loose on the desk.
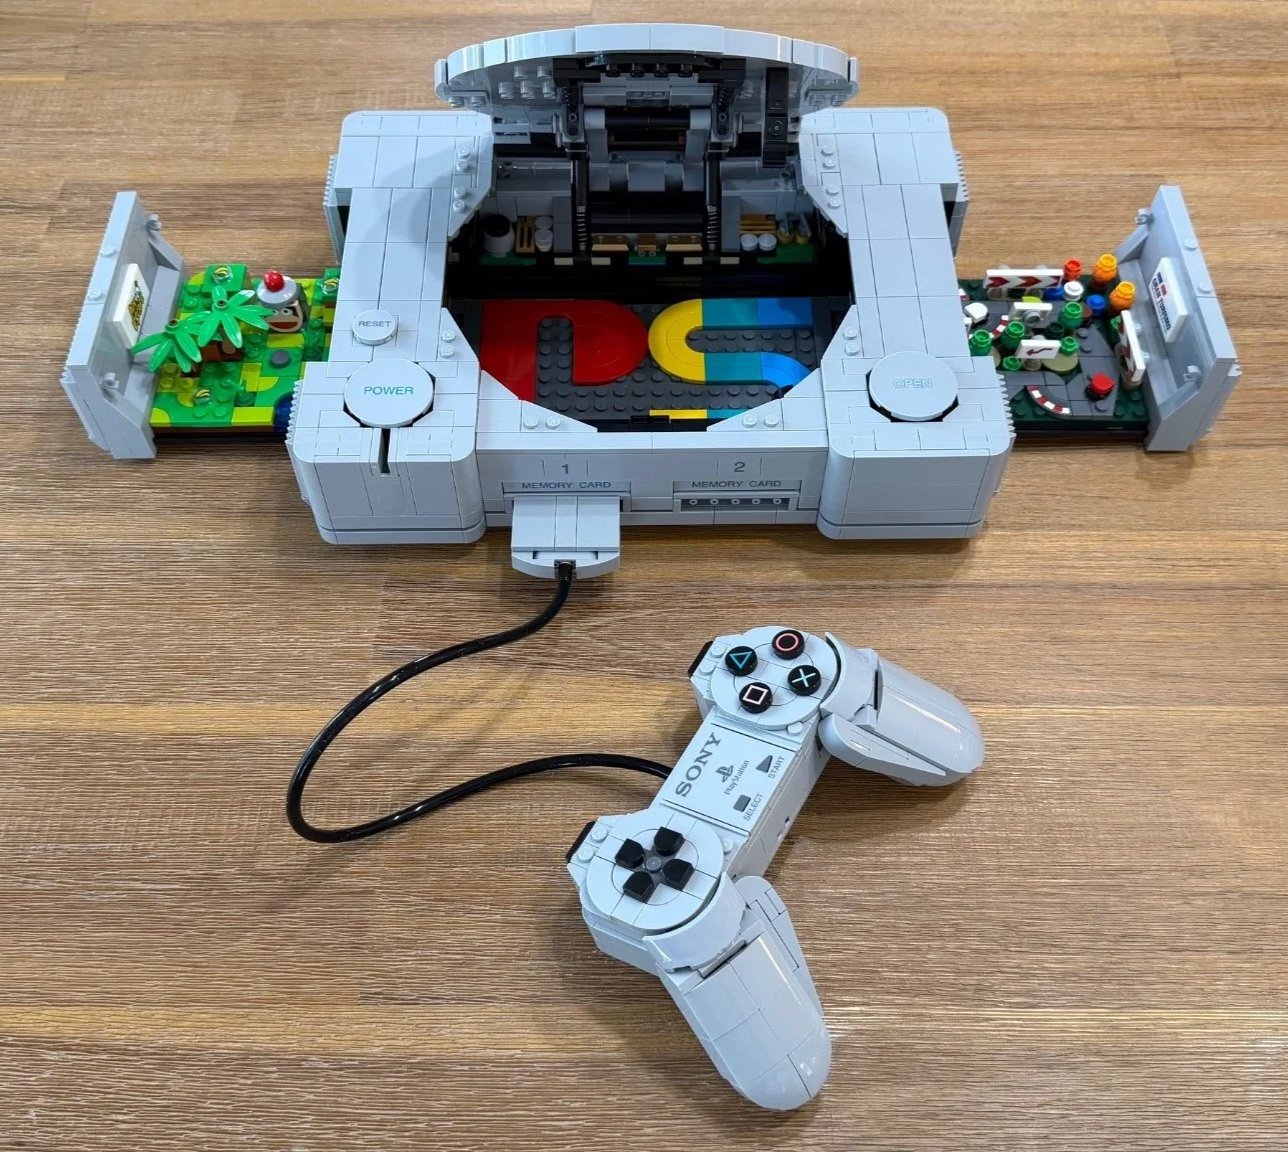
Both game scenes slide out for a closer look; their smallest pieces need gentle handling.
The front memory-card labels, controller-port numbers and top button markings are particularly satisfying. Around the back, the console diagram in the booklet identifies the recreated AC IN, AV MULTI OUT and SERIAL I/O connections. These are display details, but they help the model feel like the hardware I remember.
The printed console details also make the sticker-heavy Gran Turismo bag stand out more. I appreciated the prints; I still would have preferred fewer stickers in the little game scenes.
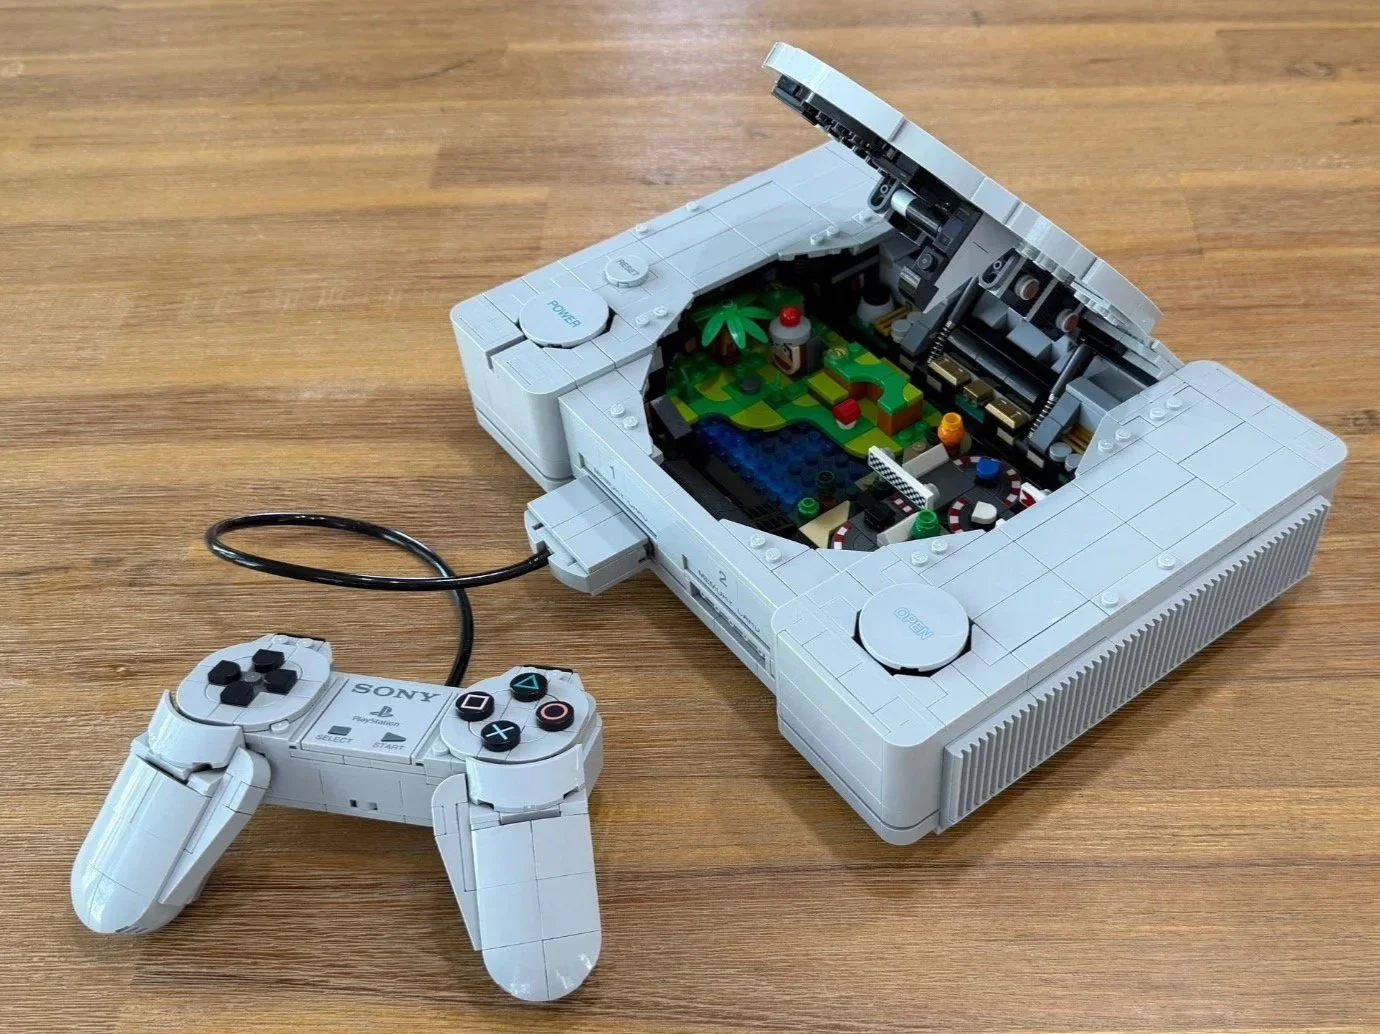
A different view of the finished set, with both hidden games on display.
Watch the PlayStation Take Shape
My Verdict — 9.6/10
The finished model looks wonderful. From a little distance, I have to look closely to pick out the LEGO construction. The console and controller felt durable when I handled them, including the connected controller plug. The small pieces in the two micro scenes are the parts I’d treat more gently.
There’s a funny tension in my verdict: Gran Turismo was my favorite bag, but the game scenes feel a little gimmicky to me as part of the finished display. I’d personally have chosen Crash Bandicoot or Tomb Raider over Ape Escape. That’s about my own PlayStation memories, rather than either game’s importance.
The controller is my favorite assembly. The power indicator is my favorite surprise. My reservations are the stickers, static controller buttons and the sticking I experienced in the console mechanisms. None of those took away the pleasure of seeing the completed set on the table.
I’d recommend it to original PlayStation fans, gamers who enjoy displaying a bit of their history, and builders interested in clever mechanical functions. LEGO rates it 18+; a younger builder working with an adult could enjoy parts of it, but the tiny scenes, stickers and tight connections are where I’d expect help to be useful.
And yes, the model has memory-card slots without a separate memory card. That brought me right back to those Crash Bandicoot weekends.
If the Gran Turismo scene is the part that catches your eye, you may also enjoy my LEGO Bugatti Vision Gran Turismo 77253 review. For more hands-on builds, visit The Bricksmith’s Build Guides.
Want Help Getting Your LEGO Set Built?
I offer LEGO assembly and rebuilding services around Greater Portland, Maine or mail-in. Send the set number or a few photos and tell me what you’d like done. I’ll review the project and provide a written scope and quote if it’s a fit.